Introduction
Overview
Teaching: 10 min
Exercises: 0 minQuestions
What is Minerva?
Why do we use Minerva in the LSP?
Objectives
Explain what Minerva is
Discuss why is Minerva used in sharing tissue image data
What is Minerva
Minerva is a suite of light-weight software tools that enables interactive viewing and fast sharing of large image data. It comprises Minerva Author, a tool that lets you easily create and annotate images, and Minerva Story, a narrative image viewer for web hosting.
Minerva is built to support the image data sharing for tissue atlases and digital pathology. LSP uses Minerva to share large tissue image data, usually but not necessarily from CYCIF.
Why Minerva?
You may ask why do we need another software tool to show people my image data?
Sharing your data can mean a different set of goals at different stages of our research and as the audience changes.
If you need to show a whole slide tissue image to a coworker who sits in the same office, it is easy to call them over to look at the already loaded image on your OMERO account. You might provide minimal explanation if they have been following your project closely, or you may offer more verbal context and point out areas of interest if they are new to your data. Imaging sharing the same tissue image with someone at a different institute, there are many more barriers in place, like obtaining credientials, long buffering time for large images, lack of guidance as they view the image etc. Minerva is the solution to these challenges:
-
Minerva lets you share large images fast - for the viewer, there’s no download needed and minimal loading time when you zoom and pan around the image.
-
You can provide context tailored for your target audience. - Tissue image data is incredibly information-dense, especially for those who are unfamiliar with your project. The introductory text and waypoint description in Minerva Stories allow you to walk your audience through your data anytime and anywhere.
-
No need for specialized software to open proprietary file formats - Minerva Stories can be viewed directly in your browser. Minerva takes OME-TIFF images and converts them into JPEGs to be viewed. In the LSP, most our images are in alreayd OME-TIFFs. If you are working with different image formats, BioFormats can convert other them into OME-TIFFs.
We will go over how to leverage these three key qualities of Minerva to share your data FAIR-ly and effectively in today’s tutorial.
Key Points
Minerva is the general term for Minerva Author and Minerva Story.
Minerva Author is the software tool to create Minerva Story. Minerva Story is a narrative image viewer for web hosting.
Minerva turns large image files into smaller ones that can be loaded as needed, allowing interactive and fast viewing in a browser.
You can annotate your image data when sharing with Minerva, providing important context for your audience
LSP uses Minerva to share large tissue image data, usually but not necessarily from CYCIF.
Automated Stories
Overview
Teaching: 10 min
Exercises: 5 minQuestions
How can I share my large tissue images with collaborators or the public?
Objectives
Create a new Minerva Story from an OME-TIFF image.
Save and Load a story to a file.
Publish a story to create web-ready files for sharing.
Automated Stories are for quick or large-scale data sharing
- All decisions about image presentation are made automatically by the Minerva Author software.
- Automated stories don’t require any manual work or decisions by the author.
- While the output might not be perfect, it’s at least very quick to produce.
Launch Minerva Author
Open your Downloads folder and navigate to the minerva_author_VERSION folder we unzipped during
Setup. Open this folder and locate the file named minerva_author or minerva_author.exe.
Windows users
You may need to navigate one folder level deeper to find the minerva_author.exe file. Once you
find it, double-click the file to launch the program. If you see a security popup, click “More info”
and then “Run Anyway”.
MacOS users
Hold the Control key and click the minerva_author file. Then click “Open” in the menu
that appears. If you see a security popup, click “Open”.
Waiting for the application to launch
A black console window will now open. This is the actual Minerva Author application, but we will interact with it through a web browser. The application will take about one minute to fully launch, at which point your web browser should automatically open a new tab displaying the Minerva Author interface. This is what the new browser tab will look like:
This part will take a while
Acknowledge that this is frustrating but assure the learners that the software team is working to eliminate this delay.
What to do if the new browser tab does not appear
If an error about web browsers appears in the console window, or the console window displays the text “Running server with N threads” but the browser tab does not open, manually navigate to http://127.0.0.1:2020/ in your browser.
- When you want to quit Minerva Author, you will close the console window.
- If you accidentally close the console window, close your Minerva Author web browser tab and re-launch the Minerva Author application by following the instructions above.
Story creation begins with selecting an OME-TIFF image
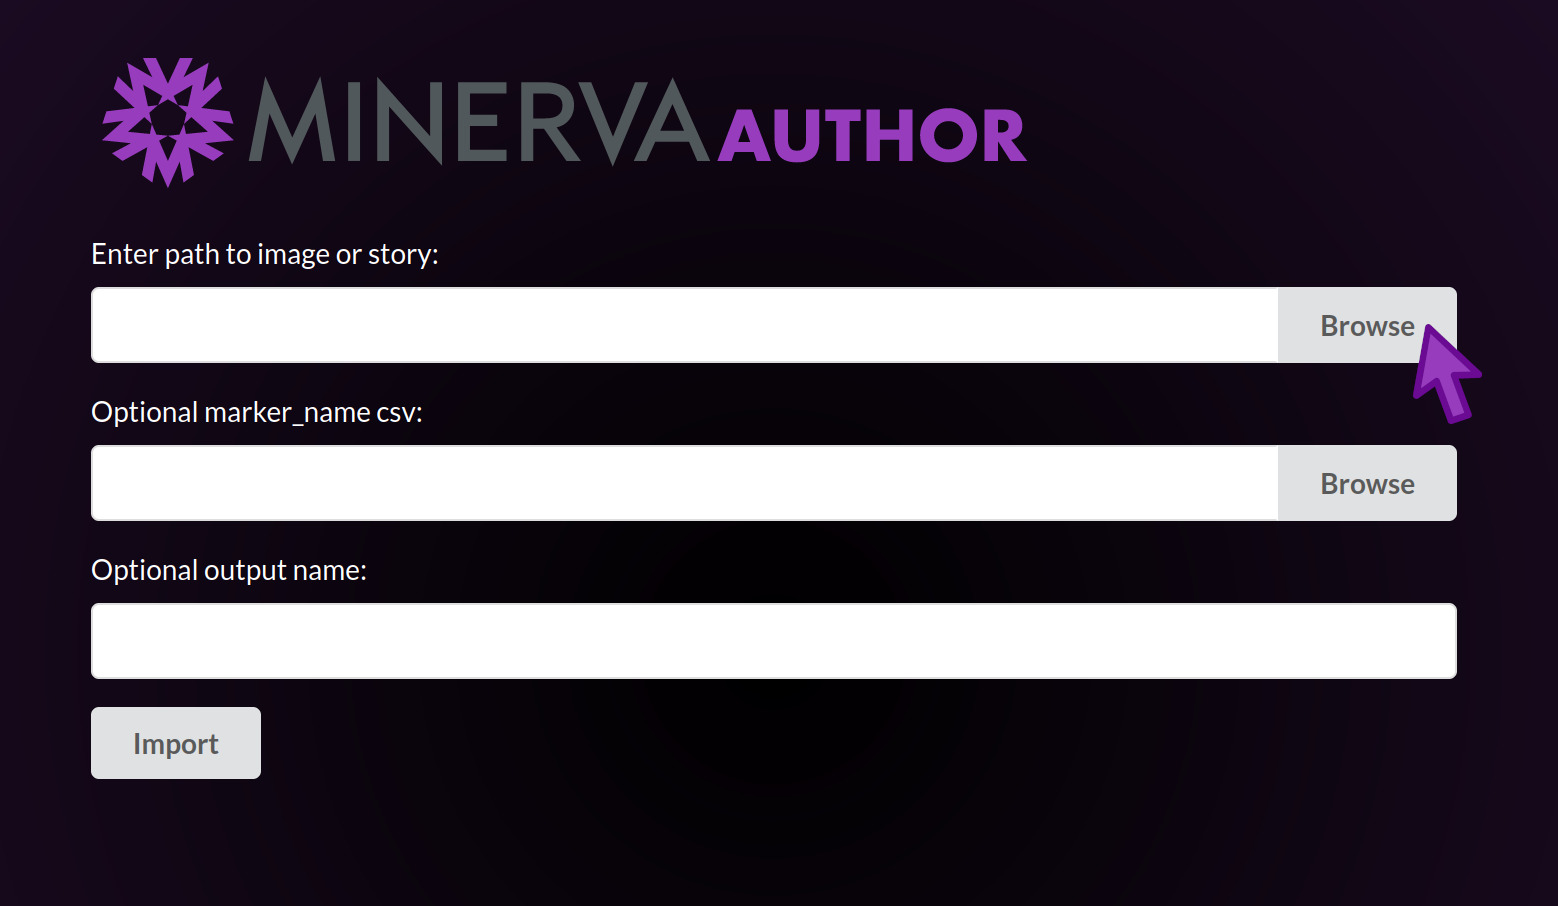
Under “Enter path to image or story”, click Browse.
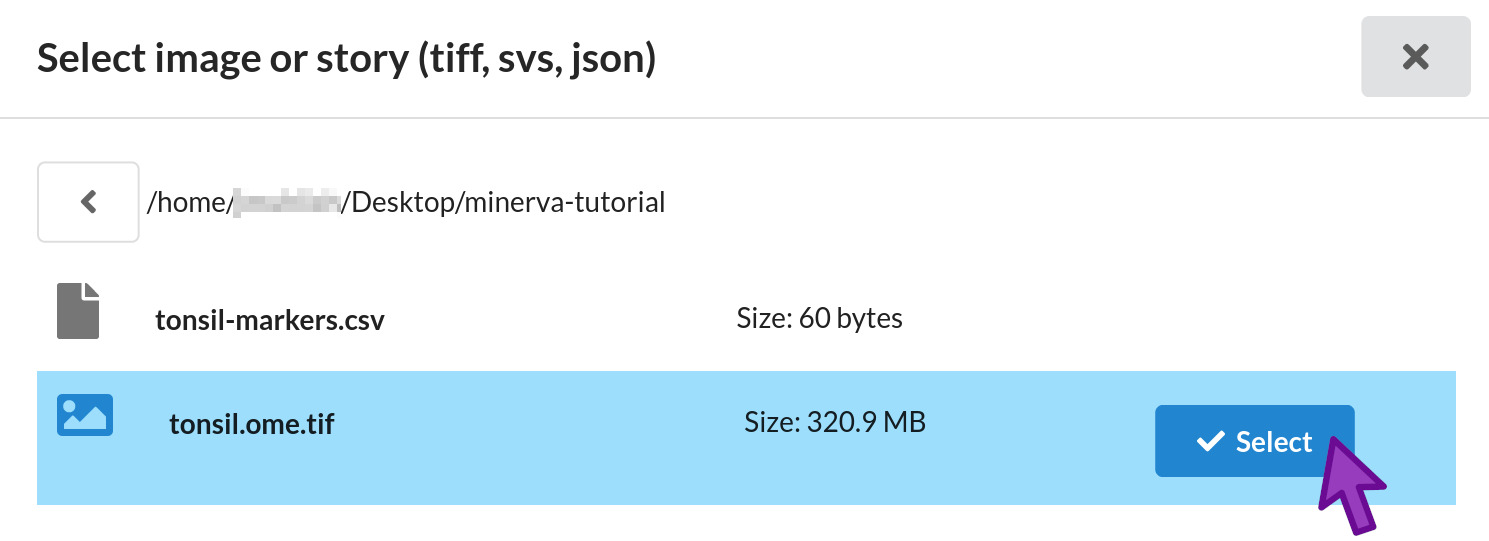
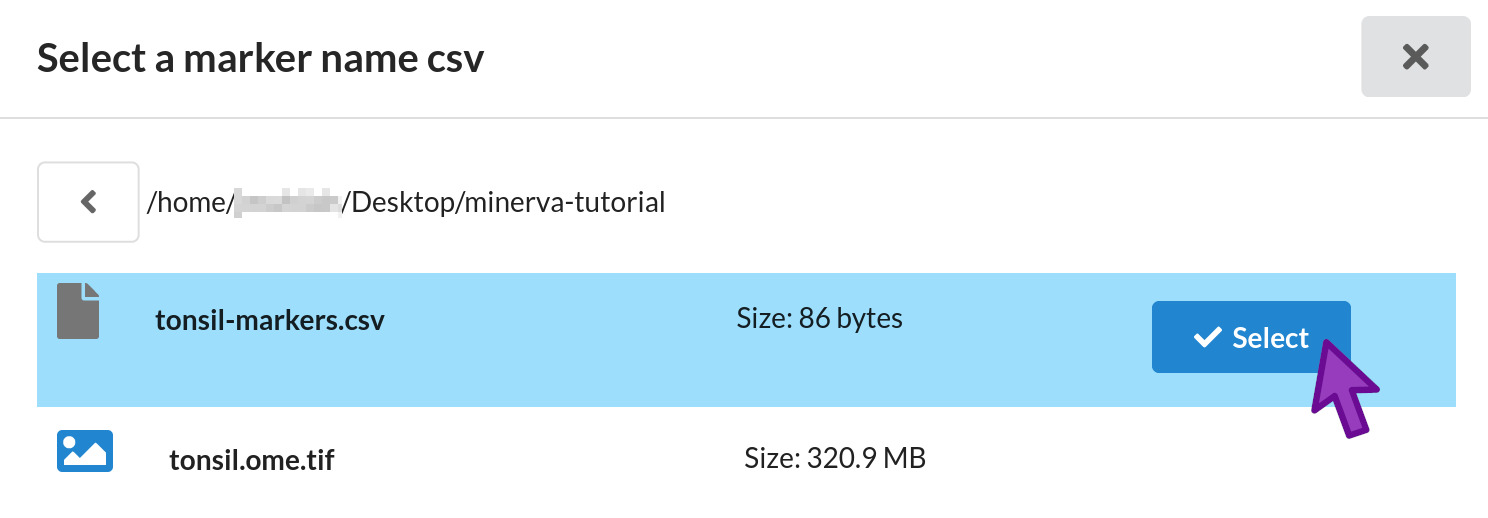
The file browser allows you to navigate your folders and files in order to choose an OME-TIFF image file with which to create your story. We will be selecting the example tonsil image we downloaded earlier.
- Navigate in the file browser to your Desktop folder, then the minerva-tutorial folder we created during Setup.
- Click the Select button next to the
tonsil.ome.tiffile. - If you navigate into the wrong folder by mistake, click the left arrow button at the top left to go back up one folder level.
- The file browser will only allow you to select OME-TIFF files (and previously saved story files, which we will cover later).
- You can close the file browser to cancel choosing a file with the X button in the upper right.
- If you click Select on the wrong file, you can click the Browse button to reopen the file browser and choose another file.
The file browser will close and you will see the full path to tonsil.ome.tif in the first form
field.
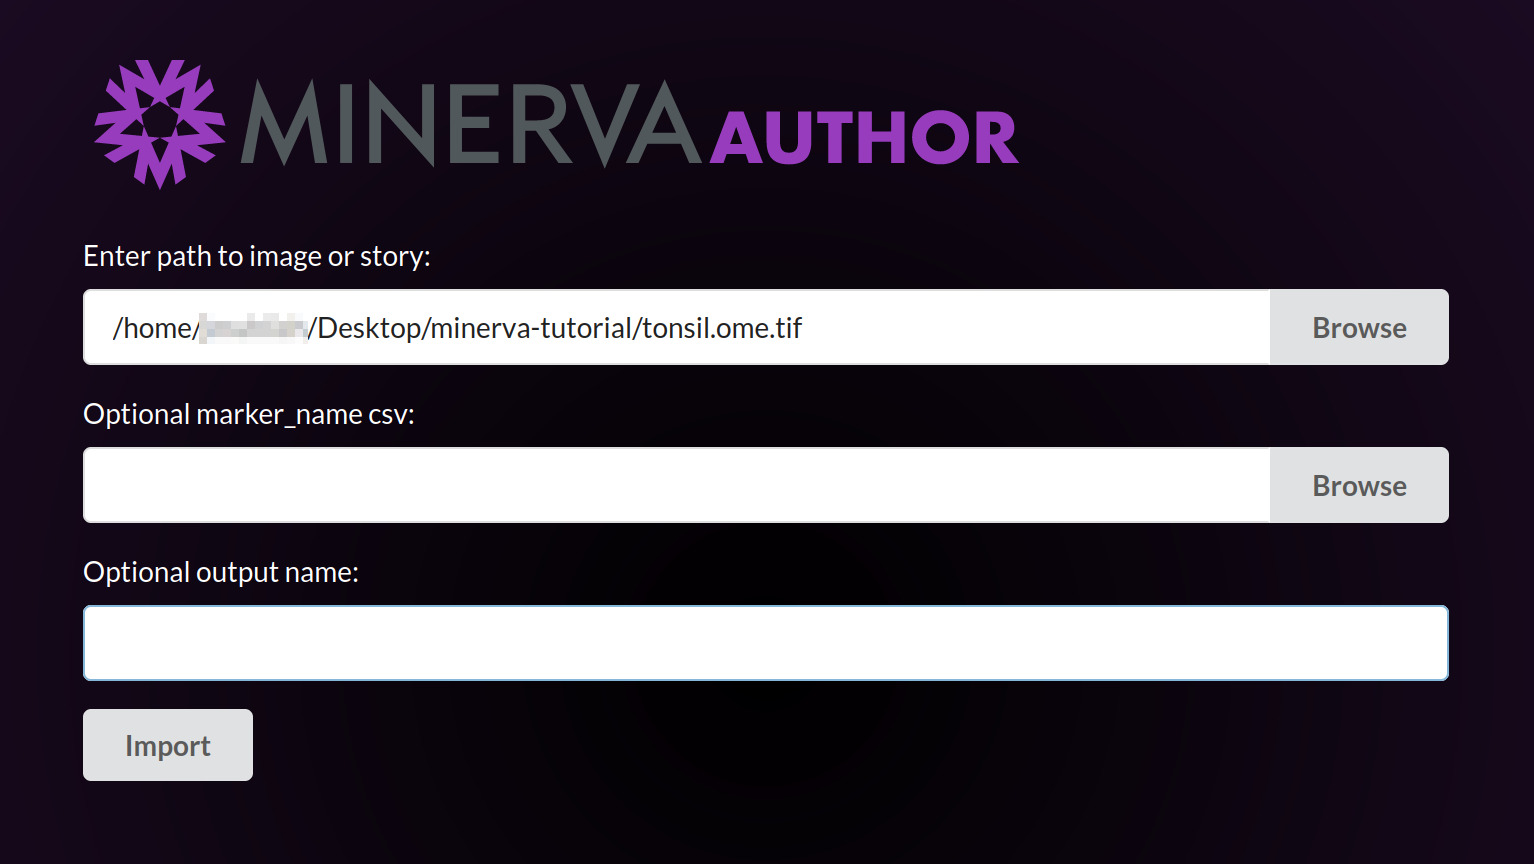
Under “Optional marker_name csv”, click Browse. The minerva-tutorial folder should still be
selected. Click the Select button next to the tonsil-markers.csv file.
- For your own images, you will select the matching “markers.csv” file used for mcmicro.
- If your OME-TIFF contains embedded channel names, you may skip selecting a marker csv file.
The file browser will close and you will see the full path to tonsil-markers.csv in the second
form field.

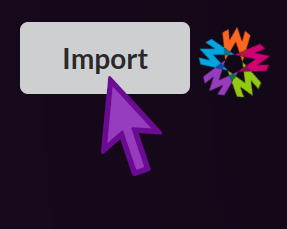
Finally, click the Import button. A spinning progress indicator will appear for a few seconds while Minerva Author loads the image.
- The time to load the image depends on how many channels the image has and how fast your computer is.
- The example tonsil image has ten channels and should load in just a few seconds.
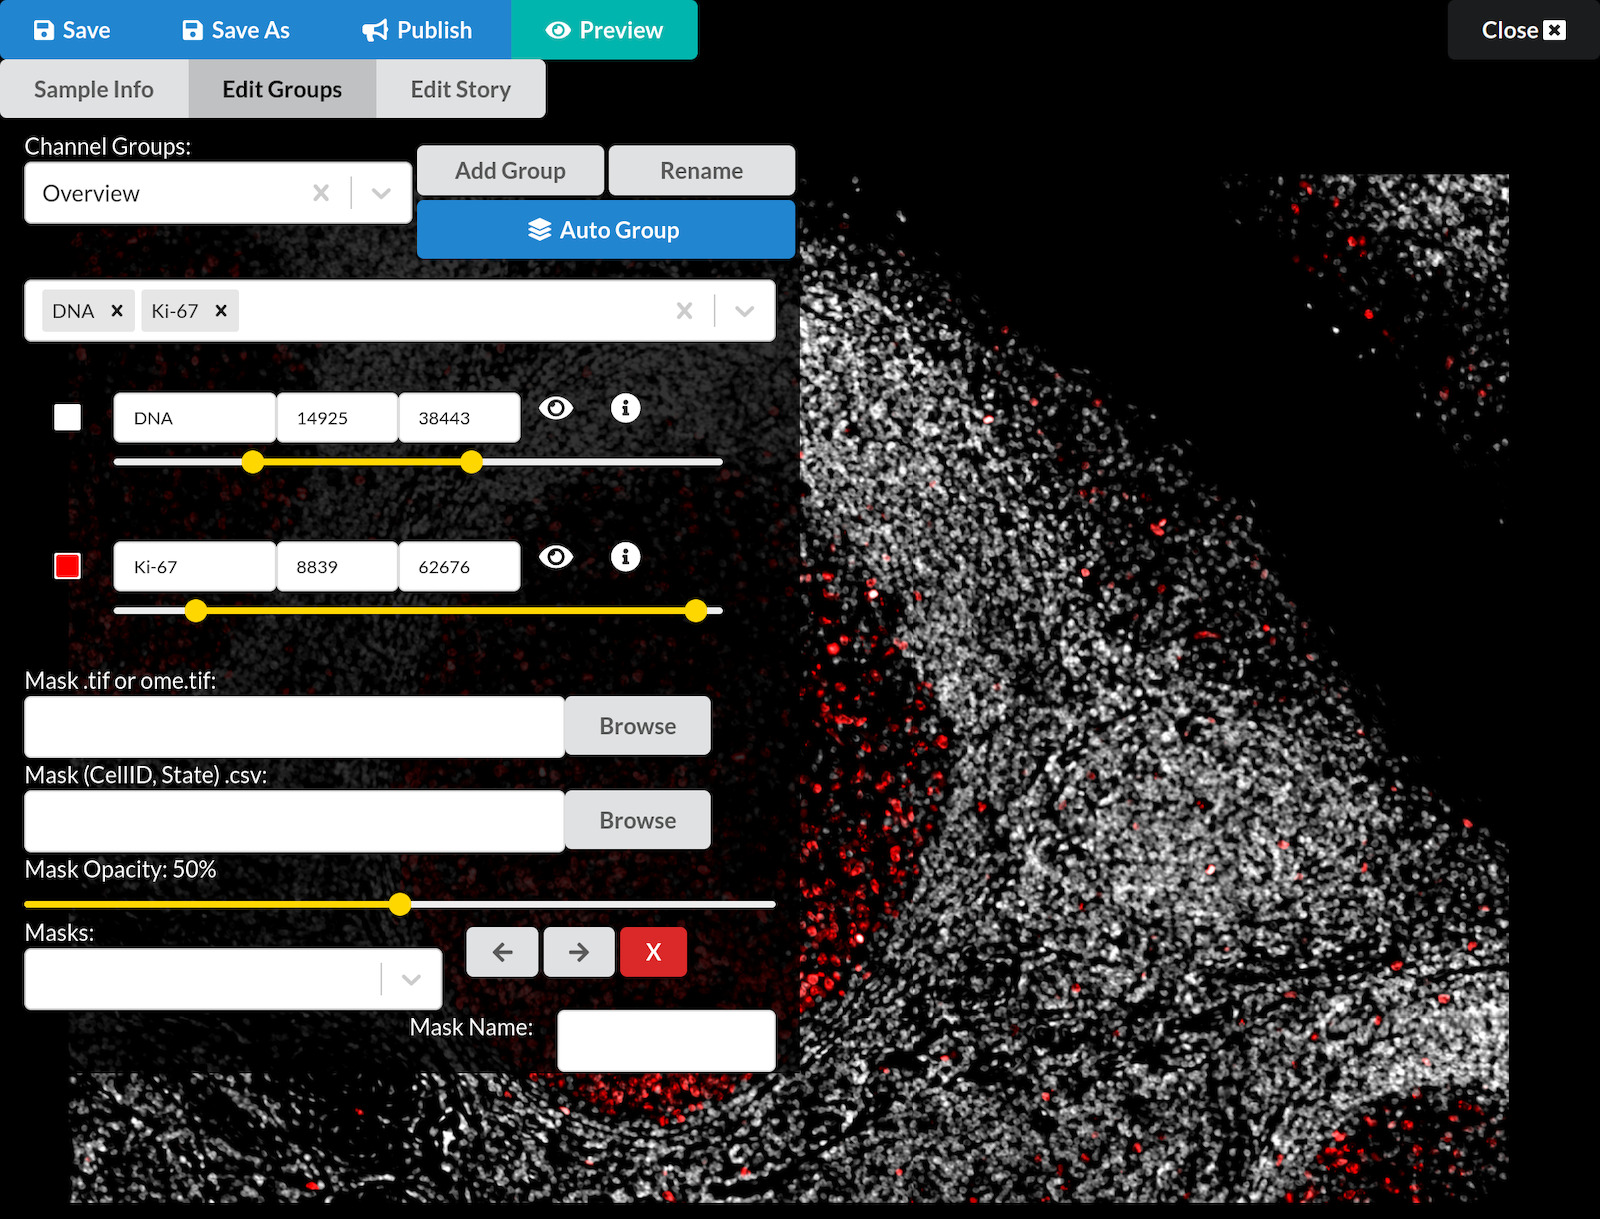
First look at the story editing interface
When the image loading is complete, the view will change to show the story editing interface.
- A dialog window will appear, displaying a summary of your input file and output location settings. Click the OK button to dismiss it.
- In the editing interface you can now see, the upper left area contains buttons and other interactive elements for editing your story. We will explain each one gradually over the course of this tutorial.
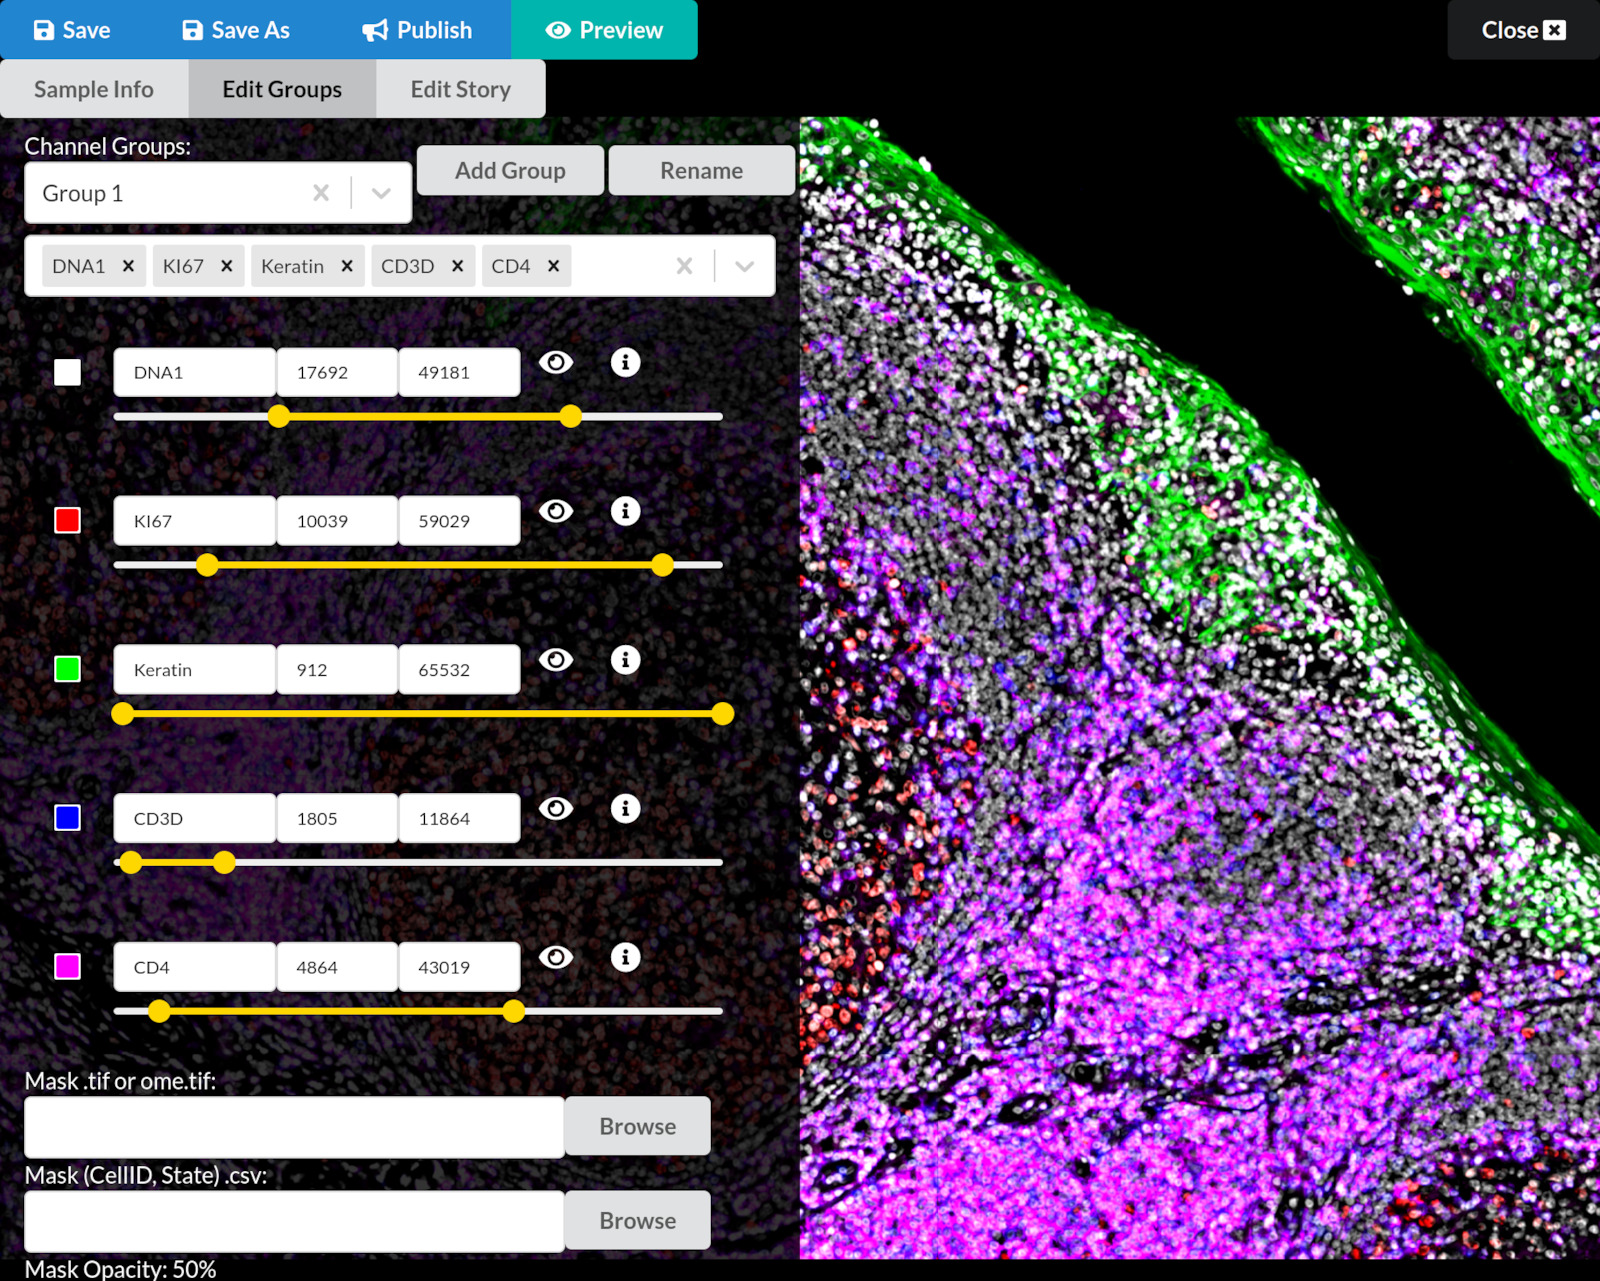
- The first two channels of the image are shown in white and red in the background.
- You can freely explore the image. To pan around, click and drag on the image. To zoom in and out, put your cursor over the image and pinch or two-finger scroll on a trackpad or scroll with a mouse wheel.
Navigating the image
Pan and zoom the image so the germinal center (the large round structure filled with red Ki-67-positive cells) is centered and fills up most of your screen.
Channel groups define meaningful sets of image channels
It is difficult to accurately display more than a few image channels at one time using different colors. Turning individual channels on and off manually would be a lot of work for viewers of a story, and furthermore viewers may not even know which channels make sense to display together in the context of your images. To help solve this problem, Minerva lets the story author group related channels together and assign them distinct colors. Later we will see how these channel groups can used to enhance the narrative flow of your story, but initially we will focus just on creating and viewing these groups.
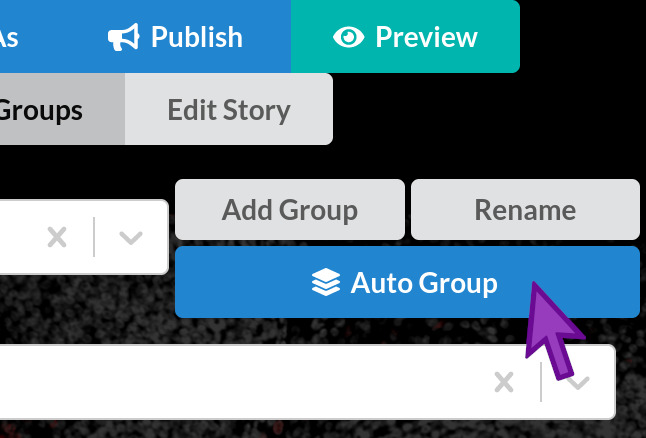
The Auto Group button groups all channels using simple rules
While Minerva Author has many options for manually configuring channel groups and other channel settings, our goal for now is to create an Automated story that doesn’t need much effort or decisionmaking. Therefore we will use the Auto Group feature, which groups and colorizes all channels in your image using a few simple rules.
Click the “Auto Group” button now. A dialog will appear with a summary of the groups to be created, and a reminder that any existing channel groups in your story will be deleted. Click OK to continue. In the future, you can use the Cancel button if you ever click Auto Group by accident.
Auto Group results (open response)
What do you notice has changed on the screen after running Auto Group?
Solution
- The image is now more colorful, showing more channels at once
- The channel groups list in the upper left now shows more channel names
- The channel settings area in the middle left now shows more channels
- The channel group selector now shows the name “Group 1” instead of “Overview” (minor point)
Channel grouping rules
- If your image has channels whose names start with “DNA” or “Hoechst” spaced regularly across the channel list, Minerva Author will assume your image comes from a cyclic imaging method such as CyCIF and create groups based on your imaging cycles. The DNA or Hoechst channels will be used as a reference to locate the cycle boundaries.
- If your channel names do not fit this pattern, channels will be grouped in sets of 3, 4 or 5 – whichever group size best fits your total number of channels.
Channel color assignment rules
Regardless of which grouping rule was used, colors will be assigned to the channels in each group using a fixed color list: 1-white, 2-red, 3-green, 4-blue, and 5-magenta. Groups with fewer than five channels will use only the lower-numbered colors in the list.
Group naming rules
The automatically created groups will be named “Group 1”, “Group 2”, and so on.
Previewing your story
Up until now, we have been looking at the story authoring interface. Once your story is published on the web, the viewing interface looks somewhat different. To see exactly what your published story will look like, click the Preview button. This will open your story in preview mode in a new tab. Explore the story in preview mode and close that browser tab when you are done.

Critique the Automated story (Pair discussion)
Before closing the preview mode tab, turn to your neighbor and discuss together what you do and don’t like about the Automated story we just created. Take a moment to notice what is drawing your eye. Do these things help you understand the data or are they making it difficult? What might you want to change?
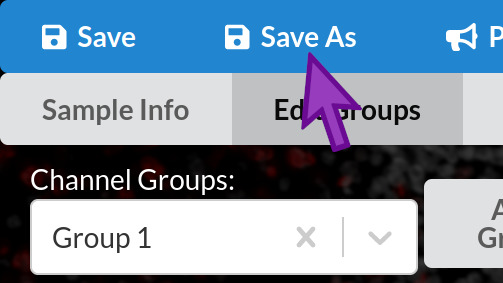
Save your story
Now that we are done with all the steps for creating an Automated story, we will save it to a file.
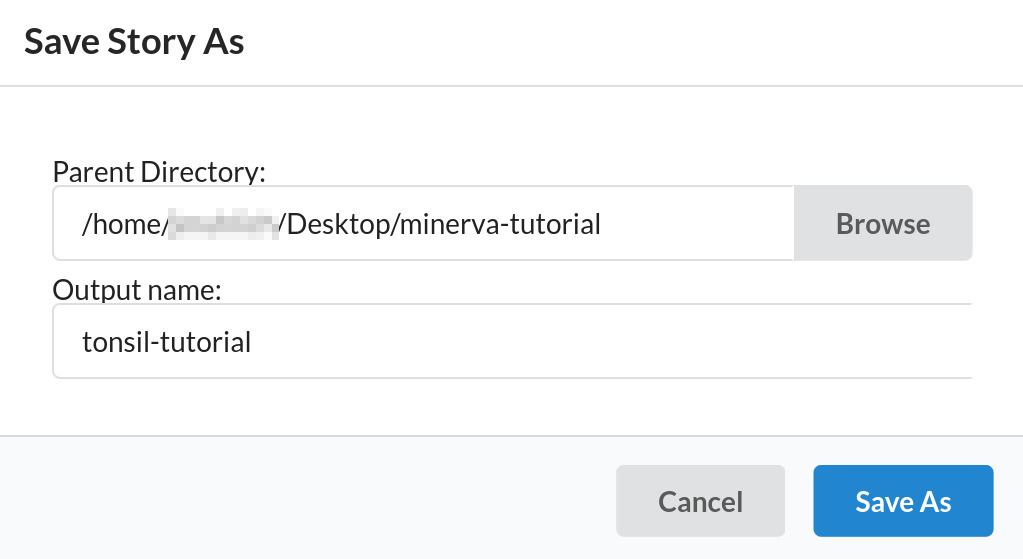
Click the “Save As” button. A dialog will appear, prompting you for a folder (directory) and file name for saving. Click the Browse button and navigate to your Desktop folder, then click the Select button next to the minerva-tutorial folder. If you accidentally navigate into the minerva-tutorial folder instead of clicking Select, click the left arrow button in the top left to go back up one level.
Click in the “output name” field, delete the existing text and type tonsil-tutorial. This name
will be used along with the extension .story.json to create your story save file. In this case the
full file name will be tonsil-tutorial.story.json. Now, click the “Save As” button on the dialog
to save the file and close the dialog.
Story save files only point to original image data
story.json files are extremely tiny, usually just a few kilobytes. They do not store a copy of your image data, but rather a pointer to where the original image file lives. If that original image file is moved or you open the story file on a different computer, Minerva Author will prompt you to find the new location of the image file.
Close and reload your story
To demonstrate that your story was successfully saved, and also how to open an existing story, we will close this story and open it back up from the save file.
First, click on the “Close” button in the upper right corner of the screen. If you see a dialog pop up warning you about unsaved changes, you can click “OK” since we know we just saved our story. If you see this later on your own, consider whether you have made any important changes since saving and click “OK” or “Cancel” accordingly.
Now, click the first Browse button and navigate to your Desktop minerva-tutorial folder. You will
notice that there are now two files with a Select button indicating they are available to open:
tonsil.ome.tif which we opened to initially create our story, and also
tonsil-tutorial.story.json which is the story file we just saved. Click Select next to the
story.json file, then click the Import button. Everything should appear as it did when we clicked
“Save As” earlier.
Auto-saving
Even before you clicked “Save As”, Minerva Story was continually auto-saving your work so you can recover if the program crashes. The auto-save files can be found in the folder next to the minerva_author program file. The auto-saves are regular story.json files that can be opened like any other story file.
Minerva Author also auto-saves after you click “Save As”. If the program crashes during editing, then upon reopening your story file you will be prompted whether to recover your story using the auto-save data.
Publishing your story
The last step is to create the file package that will be uploaded to your web hosting service for
viewing by your audience. Click the Publish button, and a dialog will appear prompting you for a
folder location and sub-folder name. We will use the default values, which will place the published
file package next to your story.json file using a sub-folder with the same base name. In this case
the sub-folder will be named tonsil-tutorial. Now click the Publish button in the dialog, which
will close the dialog and begin the publishing process. While the process is running the Publish
button will display a spinning animation, and a progress bar with percent completion will appear
below it. Once the progress bar reaches 100%, the file package is complete.
Getting your file package on the web
The process of actually putting the published file package on the web is beyond the scope of this tutorial. Consult the IT staff at your institution for guidance.
Episode wrap-up
Automated stories will adapt your image data for visual presentation using statistical models and best-effort heuristics. Usually they work well but sometimes they do fail to produce the results you were expecting. We will discuss how to address these failures in the next episode.
Key Points
Automated Stories are for quick or large-scale data sharing
Minerva Author runs in a terminal window but you interact with it through a web browser
Story creation begins with selecting an OME-TIFF image
Channel groups define meaningful sets of image channels
The Auto Group button groups all channels using simple rules
Stories are saved and loaded as small .story.json files
Publishing a story created a package of files that must be uploaded to a website hosting service
Curated Stories
Overview
Teaching: 10 min
Exercises: 5 minQuestions
How can I improve my automated story to better explain my science?
Objectives
Switch between Minerva Author’s three main editing modes and understand what tasks each one is used for.
Enter sample overview information including MITI metadata.
Create, rename and delete channel groups.
Refine channel groups by adding and removing channels.
Add channel description text to help viewers interpret the image.
Adjust channel color and brightness & contrast to highlight desired image features while de-emphasizing irrelevant ones.
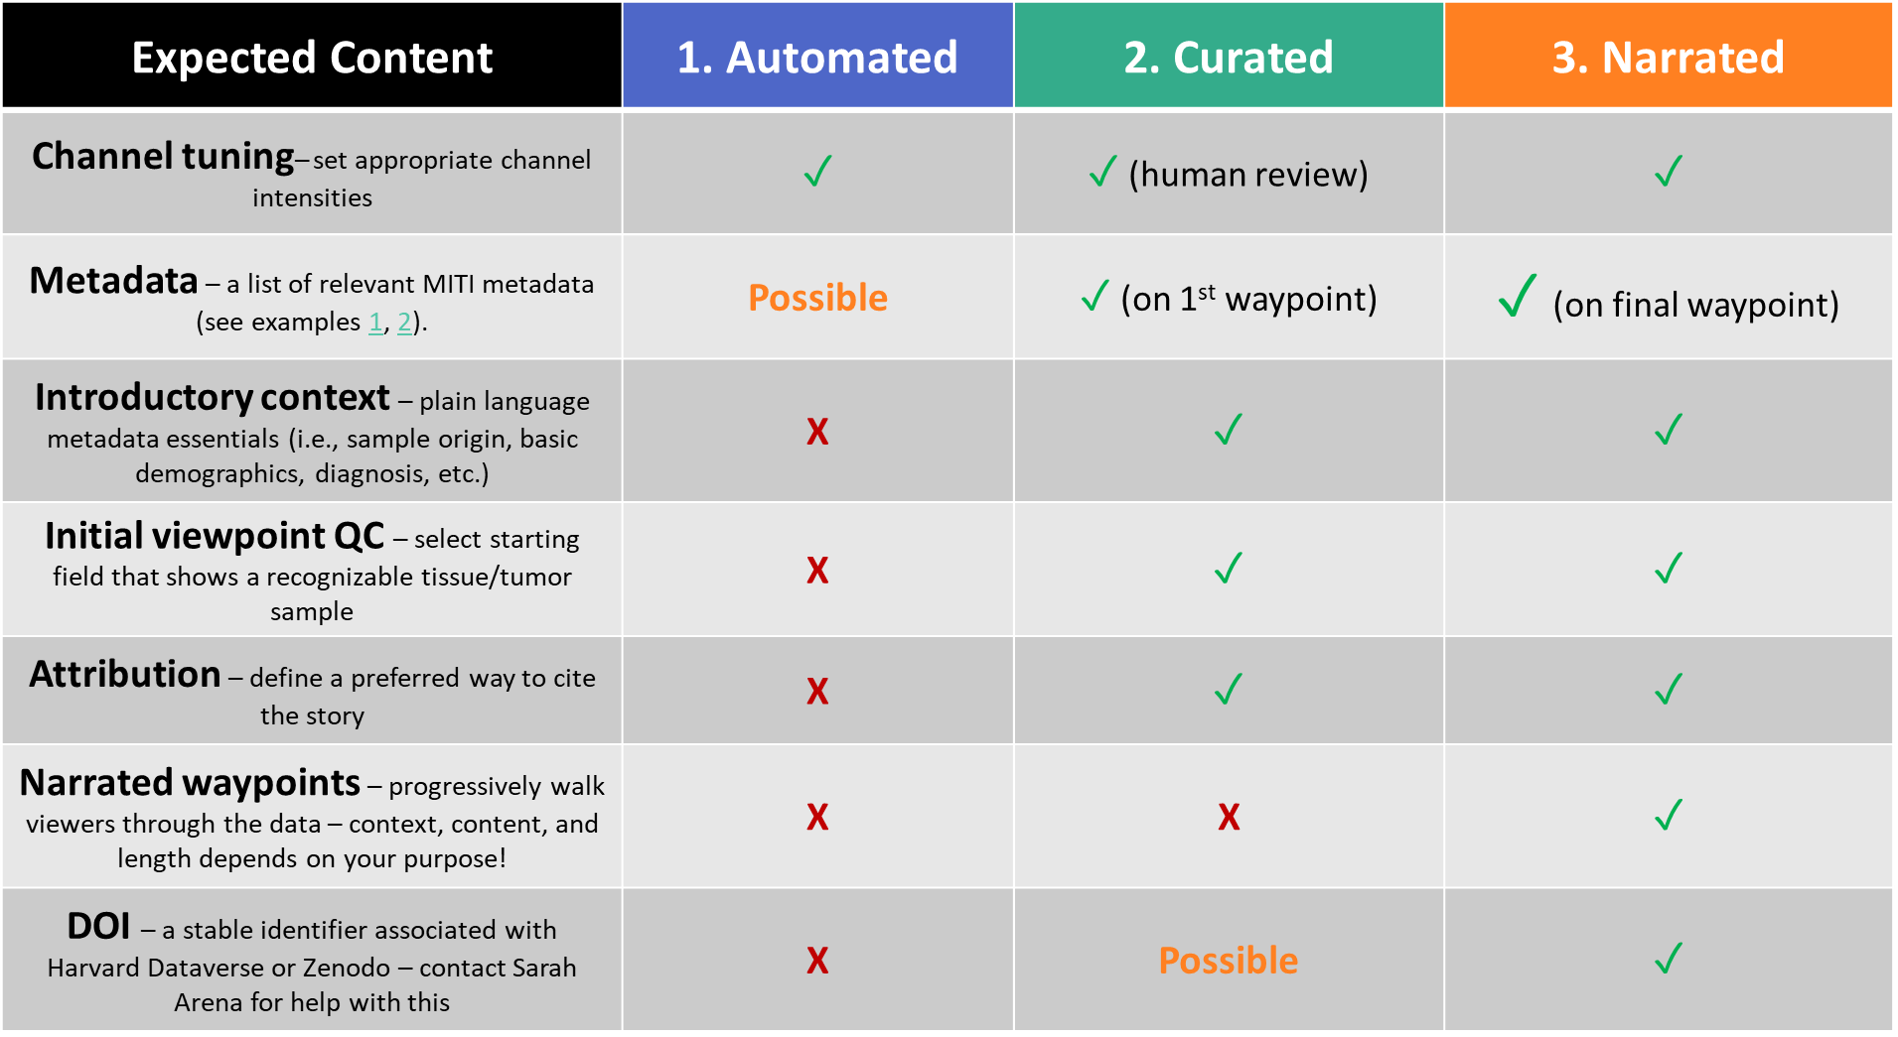
Curated Stories are reviewed for quality and context
- Curated stories involve human review for accuracy, quality and context.
- A curated story specifically includes MITI metadata and fine-tuned rendering settings.
- The stories ensure that the data is represented ideally and understandable to others.
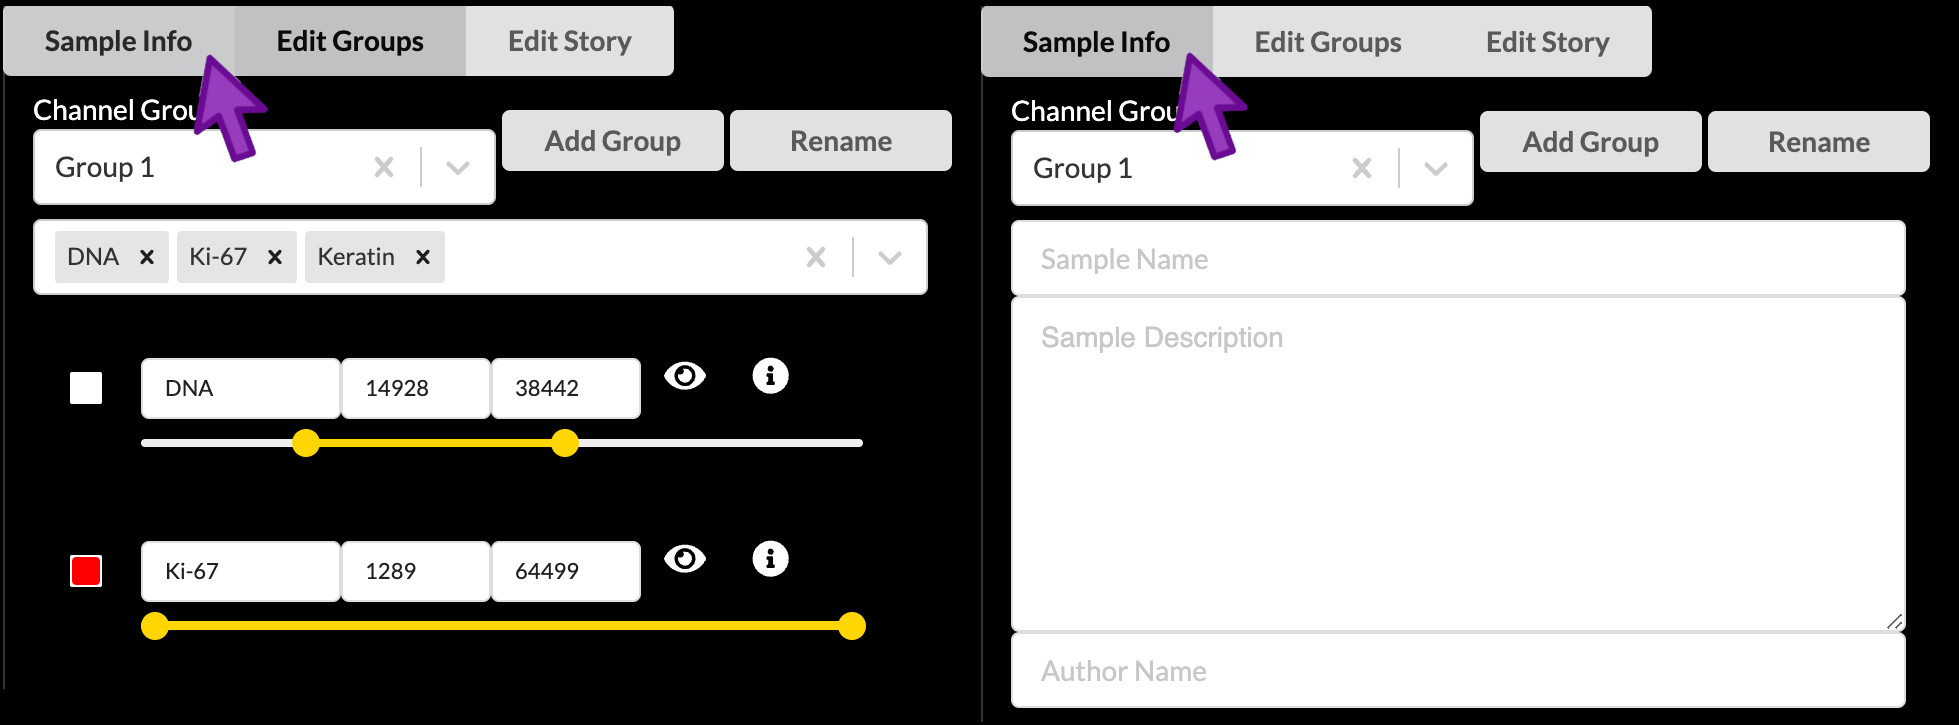
The authoring interface has three main modes
Minerva Author has three main modes for editing a story. You can switch between these modes by clicking the gray buttons just below the Save/Publish/Preview buttons. We will follow a particular sequence through the different modes during this tutorial, but on your own you are free to switch back and forth at any time.
- Sample Info lets you adjust settings and enter information that relate to your image as a whole and manage the initial image view shown when viewers first open your story.
- Edit Groups is where you manage Channel Groups, which we briefly touched on in the previous episode.
- Edit Story allows creating narrative guide elements.
For Curated stories we will only work with the first two, Sample Info and Edit Groups.

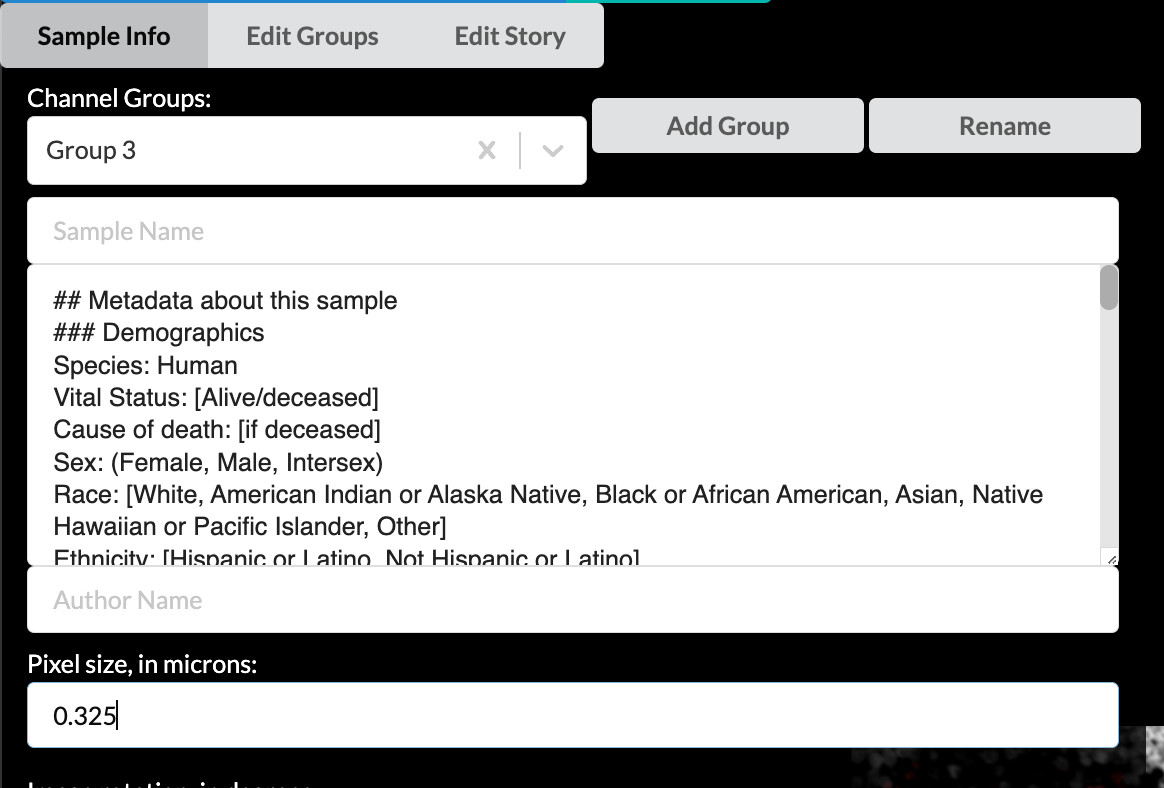
Sample Info
Click the “Sample Info” button to switch to Sample Info editing mode.
Enter sample name
Although the first item at the top of the edit screen is the Channel Groups selector, we will skip over this for now and return to it later. The first thing we will edit is the Sample Name field, which will serve as the title of the story. The LSP guidelines for a Curated story title are as follows:
- Less than 75 characters (including spaces)
- Include the following pieces of information:
- Tissue histology or sample type
- Sample identifier (usually LSP Slide ID)
- Preparation or imaging method (optional)
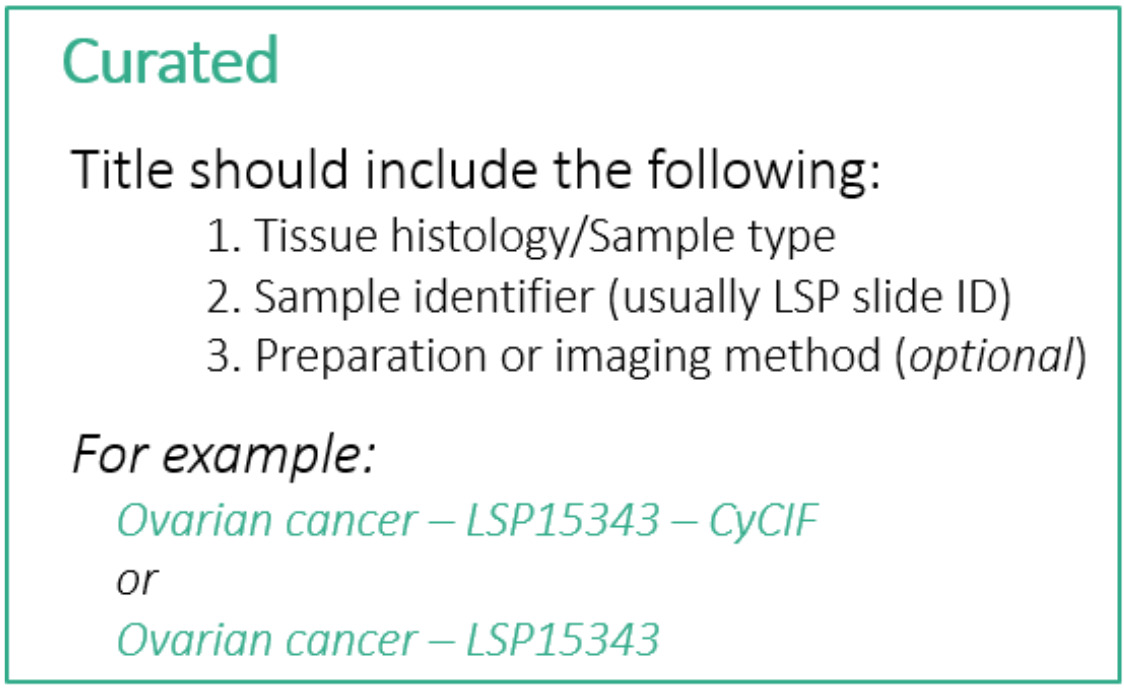
For this story we will follow these guidelines and use the title “Tonsil - TONSIL-1 - CyCIF”. You can find this title text in the file content-03.txt that we downloaded during setup. Open that text file now and leave it open for the rest of this episode as we will be copying other pieces of text from it. The title text is at the top under the heading “Title”.
Write a plain-language summary to provide context
Next we will proceed down the screen to the Sample Description field. Here you will begin by writing a short summary of the sample in plain text to provide context to viewers of the story. This summary should include a few key pieces of metadata such as the sample origin, basic demographics, and patient diagnosis. You can find a pre-written summary in content-03.txt under the heading “Sample summary”. Copy the text there and paste it into Minerva Author in the Sample Description field.
The Sample Description field allows you to apply rich text formatting using a special syntax called Markdown. You can look up a Markdown guide online to find out what it can do, and we’ve provided a link to such a guide in the reference material for this lesson. The provided summary text does not use any Markdown syntax, but in the next step we will see some basic examples.
Paste and edit the MITI metadata template
Below the summary text you will now append relevant metadata fields based on the MITI (Minimum Information about Tissue Imaging) standard. LSP has a comprehensive metadata template hosted on SharePoint, but for today we will use a shortened version. The template provides an easy-to-edit Markdown-formatted list of the metadata fields that you should strongly consider filling out where relevant. It provides a common baseline that all Curated stories at LSP should meet, but you can always add more fields to your story if you like.
Switch to content-03.txt and copy the text under the heading “Metadata template”. Paste the text below the summary text we added in the previous step. You will notice some unusual punctuation characters like pound signs and asterisks – these are part of the special Markdown syntax to create headings, bold text, and the like, but you will not have to touch any of that for the template. You will fill in your values at the end of each line or edit the placeholder text as needed. It is important to enter your text immediately next to the final asterisk, leaving the two blank spaces at the end of each line in place (these spaces are required for the template formatting to work properly).
Lastly, using the field values provided below the metadata template section in content-03.txt, fill in the corresponding lines in the metadata template (Site of Resection or Biopsy, Microscope, Objective, and Attribution). I will fill out my template as a reference to follow. For this tutorial, you can choose to either delete all the irrelevant or unknown fields or play around with filling them out however you wish. As the sample was fully deidentified as part of the sample collection protocol, we simply don’t have much information about the patient.
Click the Preview button to view your Sample Description content as it will look once published and make sure the content and formatting looks the way you want it to. Close the preview tab when you’re ready to continue.
Verify or enter pixel size to create a scale bar
Farther down the screen you will see a field labeled “Pixel size, in microns”. A value of approximately 0.325 should have been automatically loaded from the OME-TIFF metadata in our example image. For your own stories, always check that this value is correct. If it is blank, look up the pixel size for your image (also called nominal image resolution) and enter it here. The value must always be specified in microns. The value in this field will be used to give your story a scale bar, which is a crucial component of image interpretability.
Editing channel groups and channel settings
Next we will spend some time learning how to edit channel groups and channel settings. Click the “Edit Groups” button to switch to that mode.
As we have seen, the way the image channels are grouped by the Automated story creation process does not necessarily highlight useful aspects of tissue biology that you might wish to show to your story viewers. The first thing we will do to address that is decide on more useful groups and rearrange our channels accordingly.
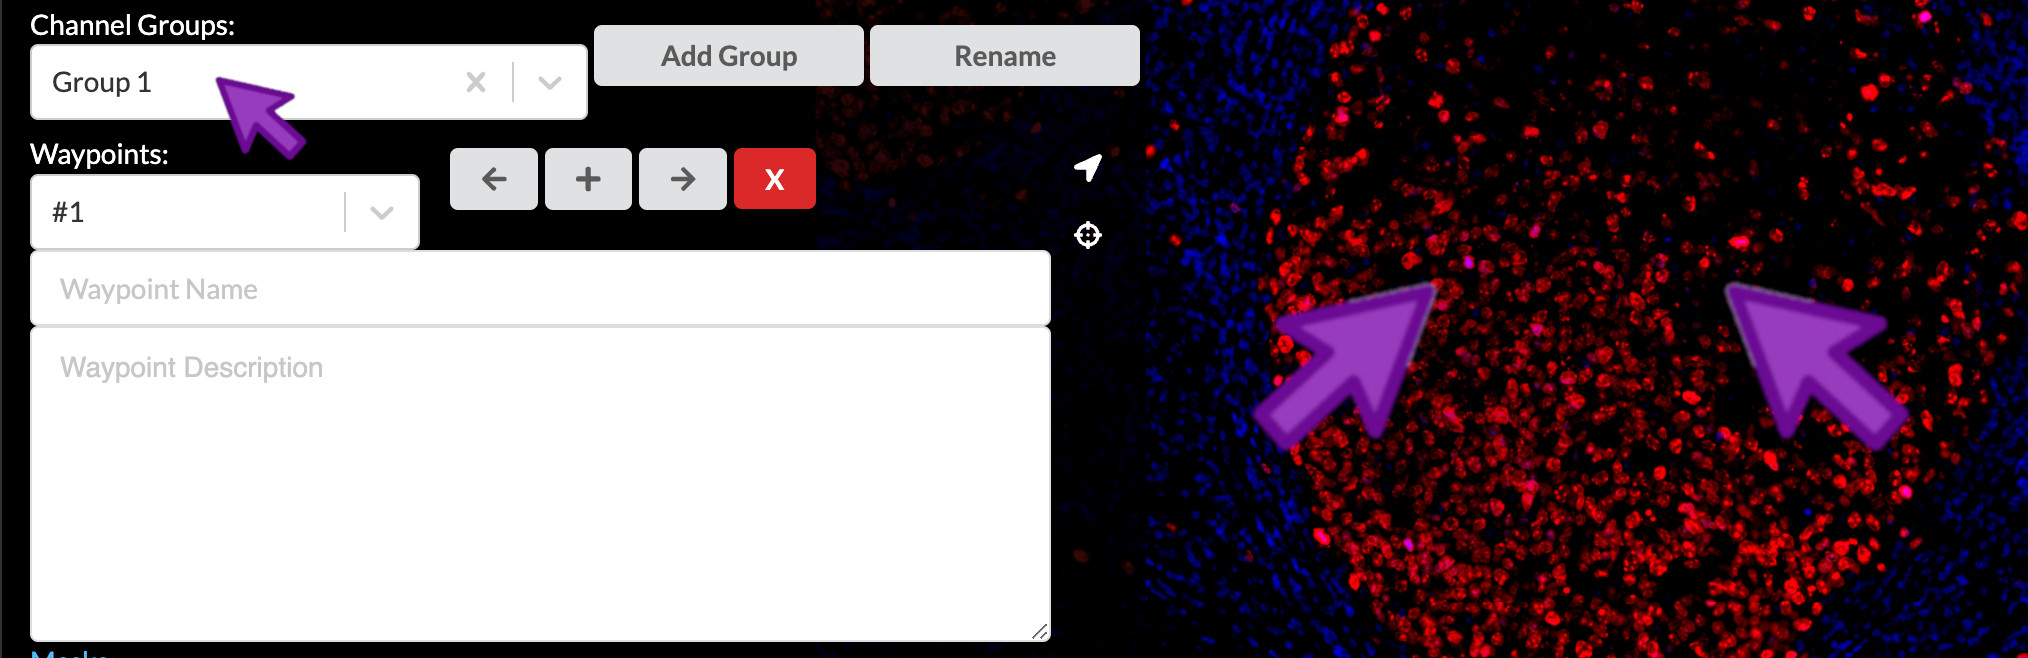
Select and rename a channel group
You can select a channel group to work with from the dropdown menu under “Channel Groups”. To change the name of a channel group, click the “Rename” button, type the new name into the popup, then click OK. Each channel group must have a unique name within a story.
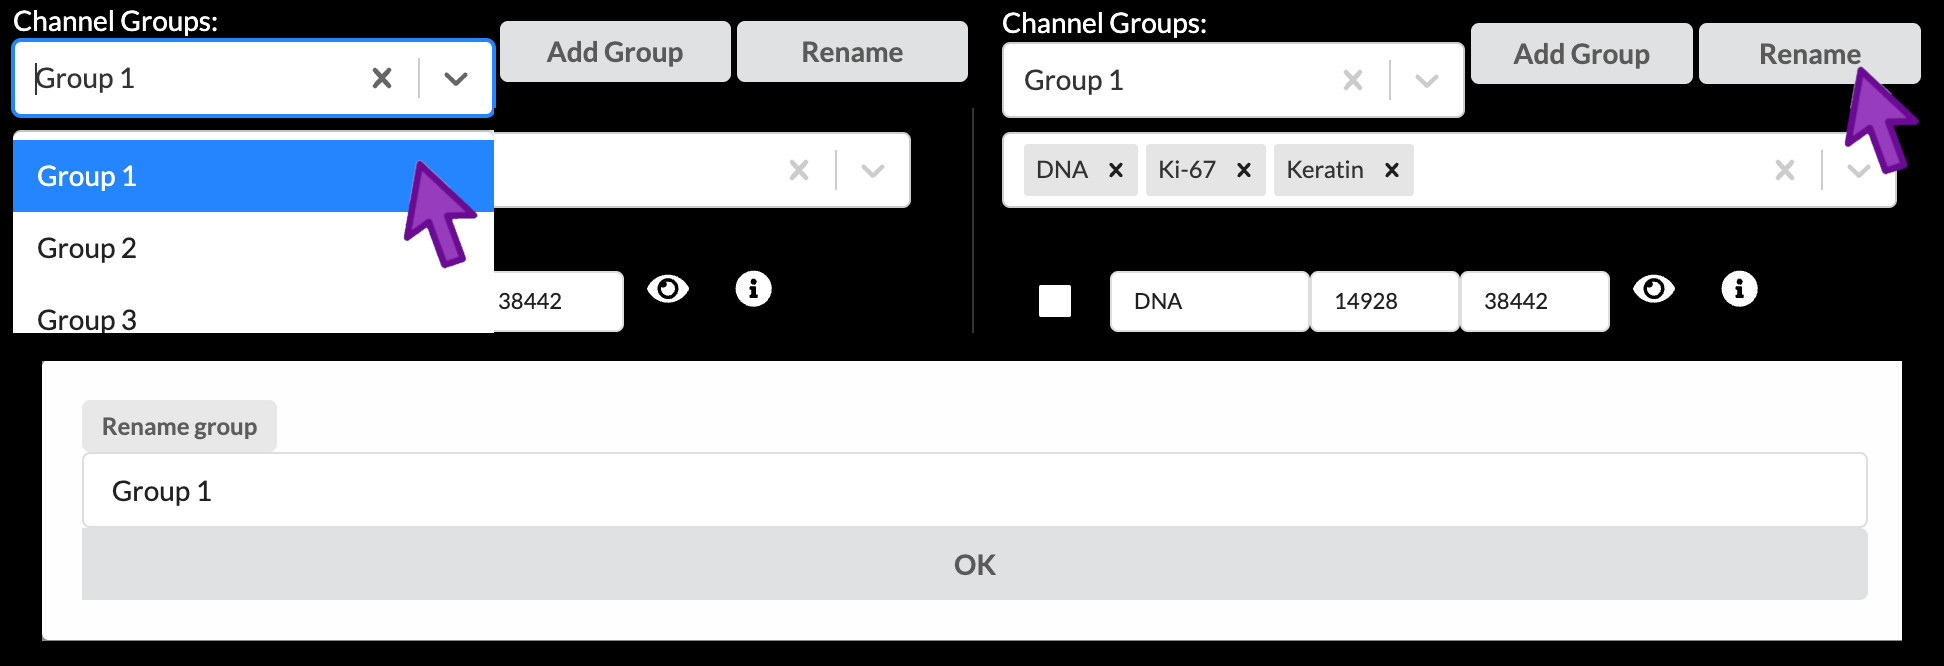
Addding and removing a channel group
A new channel group can be added by clicking “Add Group”, typing the desired name in to the popup, and clicking “OK”. The currently active channel group can be removed by clicking the “X” just to the right of its name.

Removing a channel group never deletes the channels that were in it
Channels themselves can never be deleted from a story. If you delete a channel group, its channels always remain available to add to other groups.
Let’s make our first group show the overall tissue architecture of the tonsil tissue, along with a general-purpose immune cell marker. It looks like Group 1 is already pretty close, containing DNA, Ki-67, and Keratin, so we will rename Group 1 for this purpose. Then we will create a new group to highlight different immune cell types, and lastly delete Group 2.
Rename, add and remove channel groups
- Rename the channel group “Group 1” to “Structural components”.
- Add a new channel group named “Immune cells”.
- Delete channel group “Group 2”.
Adding and removing channels from groups
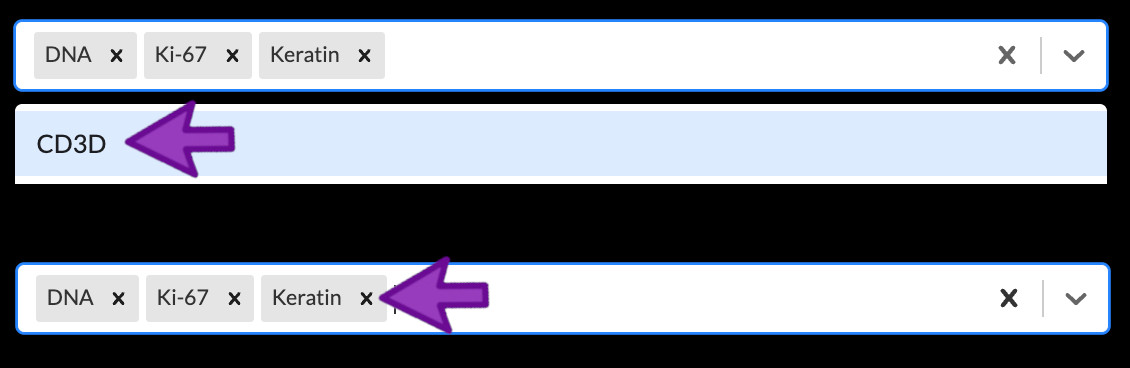
You can add a channel to the active channel group by clicking the down arrow in the channel dropdown menu (or the empty white space to the left of the arrow) to open the list of channels, followed by clicking a channel. You can also type to search for a channel by name while the channel list is open. Remove a channel from the group by clicking the small “X” next to its name. If you ever want to remove all channels from a group, click the large “X” near the right side of the channel dropdown menu. Note that a channel may belong to more than one group at the same time – for example, many stories of CyCIF images include the first DNA channel in every group as a reference to show where all cells are located regardless of marker expression.
Removing a channel from a group does not delete the actual channel
This is another reminder that channels themselves can never be deleted from a story. If you remove a channel from a group, it always remains available to add to other groups.
Reordering channels within a group
You can drag the gray channel name boxes left and right to change their order. This only changes the order in which the channels will be presented in the published story’s channel legend but can be useful in some cases.
Now we will refine our two channel groups to contain the correct channels.
Add and remove channels from groups
- Add the following channels to the “Structural components” group:
- α-SMA
- CD45
- Remove the following channels from the “Structural components” group:
- CD3D
- CD4
- Drag Keratin left to order it between DNA1 and Ki-67.
- Add the following channels to the “Immune cells” group:
- CD20
- CD8A
- CD4
- CD3D
Channels may extend beyond your screen
When a channel group contains more channels than can be displayed on a single screen, you can use your mouse or trackpad to scroll down to view the additional channels.
Adjusting per-channel settings
Now we will move our focus down from the channel dropdown menu to the channel settings list where we can adjust name, color, brightness and contrast, and more.
Renaming channels
You may rename a channel by clicking on the box containing its name in the channel settings list and editing the text.
Rename channels
- Edit the DNA1 channel’s name to “DNA”.
- Edit the KI67 channel’s name to “Ki-67”.
Creating channel descriptions
Short channel names are an efficient shorthand for those who already know the significance of the referenced proteins or other biomarkers, but they are much less helpful to outsiders from a more general audience. It is strongly suggested that you write a brief description (up to 30 characters) of each channel that explains its intended interpretation in the context of the tissue sample and the overall experiment. You can add these descriptions to the channels in your story by clicking the encircled “i” button to the right of a channel’s entry in the channel settings list. Then enter the channel’s description into the popup and click OK.
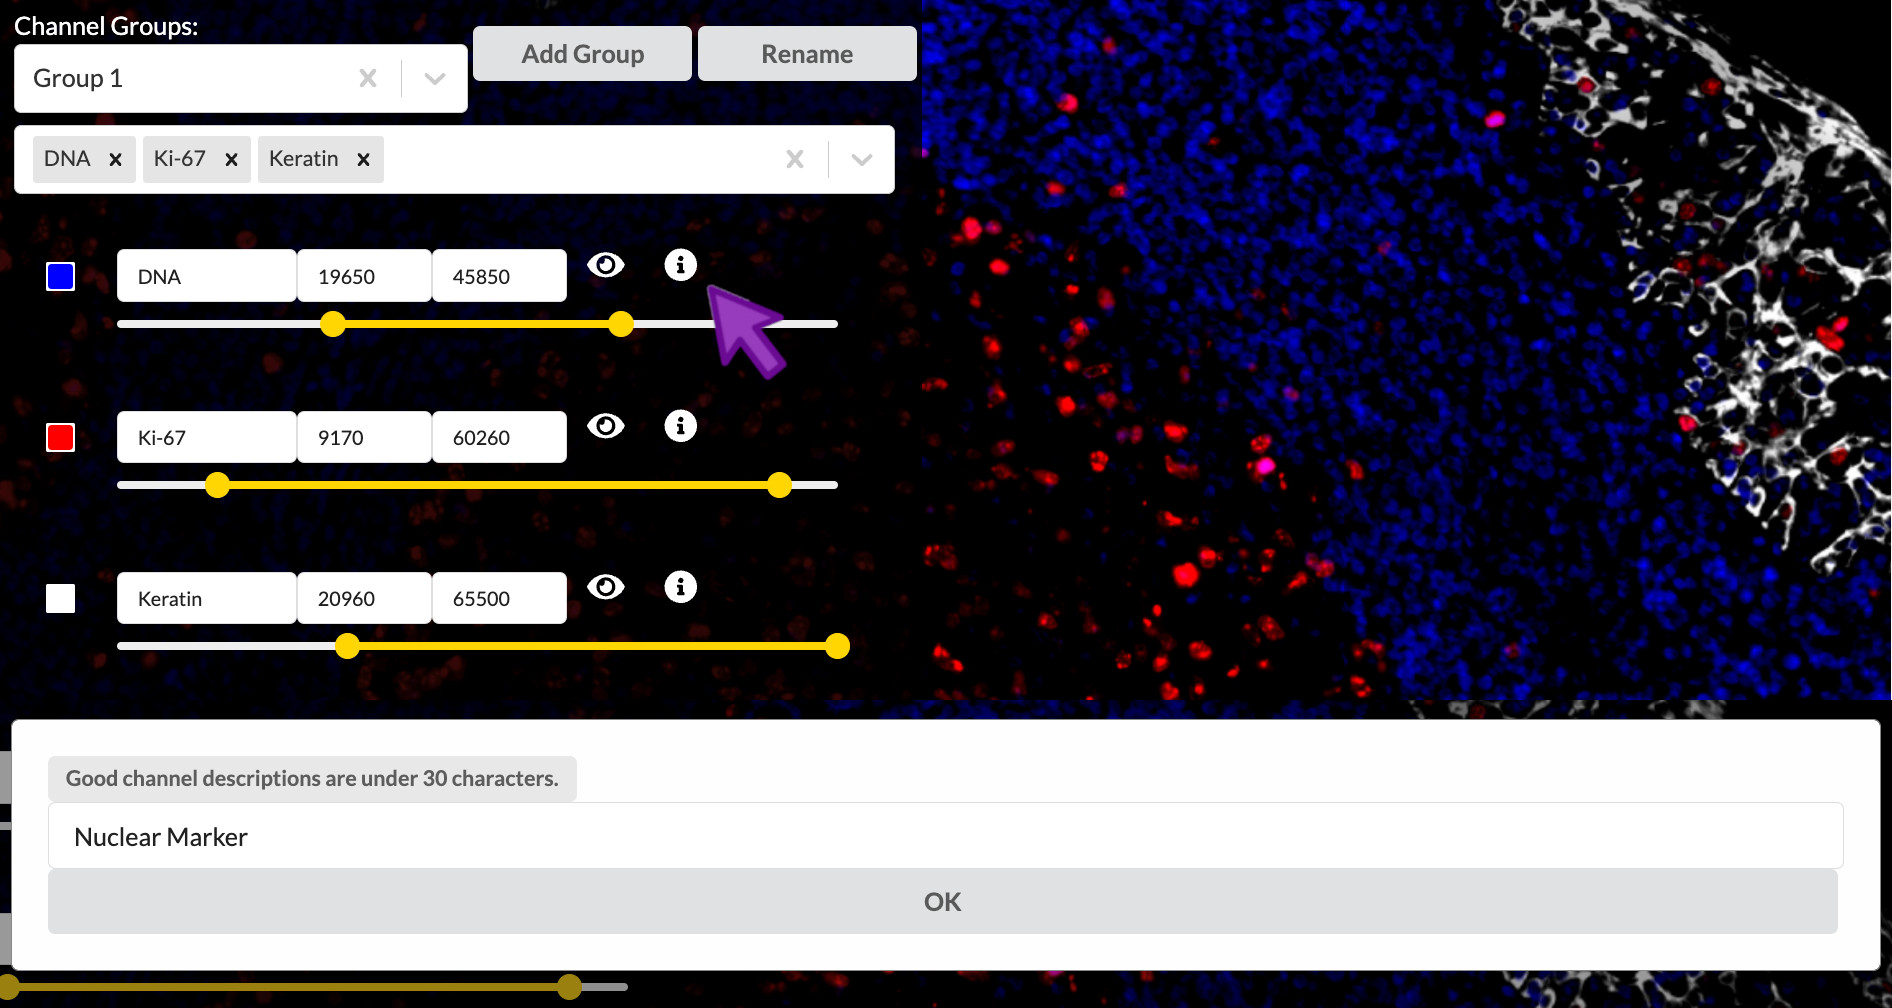
Enter channel descriptions
Set the channel description for all nine active channels as follows. This text is provided at the end of content-03.txt if you wish to copy and paste it. Note that you will need to switch between the channel groups to get to all the channels.
- DNA1: Nuclei
- Keratin: Crypt epithelium
- Ki-67: Proliferating immune cells
- aSMA: Blood vessels
- CD45: Immune cells (general)
- CD20: B-cells
- CD8A: Cytotoxic T-cells
- CD4: T-helper cells
- CD3D: T-cells (all)
Toggle a channel’s visibility
You can show or hide a channel by clicking the “eye” icon to the right of its entry in the channel settings list. This effect is not reflected in the published story, but it can be useful to temporarily isolate channels when adjusting color or brightness and contrast settings.

Brightness and contrast
You can move the endpoints of the yellow intensity range slider to adjust the brightness and contrast of the corresponding channel in the active channel group. Moving the right handle of slider will set the upper intensity cutoff value, meaning all pixels brighter than this value will be displayed at maximum brightness. The left handle controls the lower cutoff, meaning all pixels dimmer than this value will be displayed as black, in other words not visible. Pixel values in betweeen the two cutoffs will be mapped linearly to brightness values on the screen display. Any adjustments will to apply to the channel across all channel groups it is in and any groups it may be added to in the future.
Notice that these cutoffs are all at different values in each channel, and they did not start at their extreme values as is often the case in other image display applications. This is part of the Automated story process and actually happened when you first loaded the image in the previous episode. Minerva Author uses a statistical model to make a principled guess at what the cutoff values should be based on the distribution of pixel intensity values in each channel, but it isn’t perfect and it has no idea of what part of the signal intensity scale is actually relevant to your biology.
Lowering the upper cutoff has the effect of increasing the channel image brightness, so you usually want to lower it as far as possible. However lowering it too far will wash out the brighest parts of the image and destroy the texture and finer details of those cells. Raising the lower cutoff has the effect of hiding background signal and dimmer non-specific binding, raising the apparent signal-to-noise ratio. However raising it too far will hide important details in the dimmer regions of the image. Adjusting the intensity cutoff values requires making tradeoffs between a punchy image and faithfully representing the data.
The intensity range slider provides a direct way to control how each image channel is rendered, yet has the same effect as adjusting brightness and contrast. The goal is to keep in mind the biological significance of the image representation while presenting what you want your viewer to see.
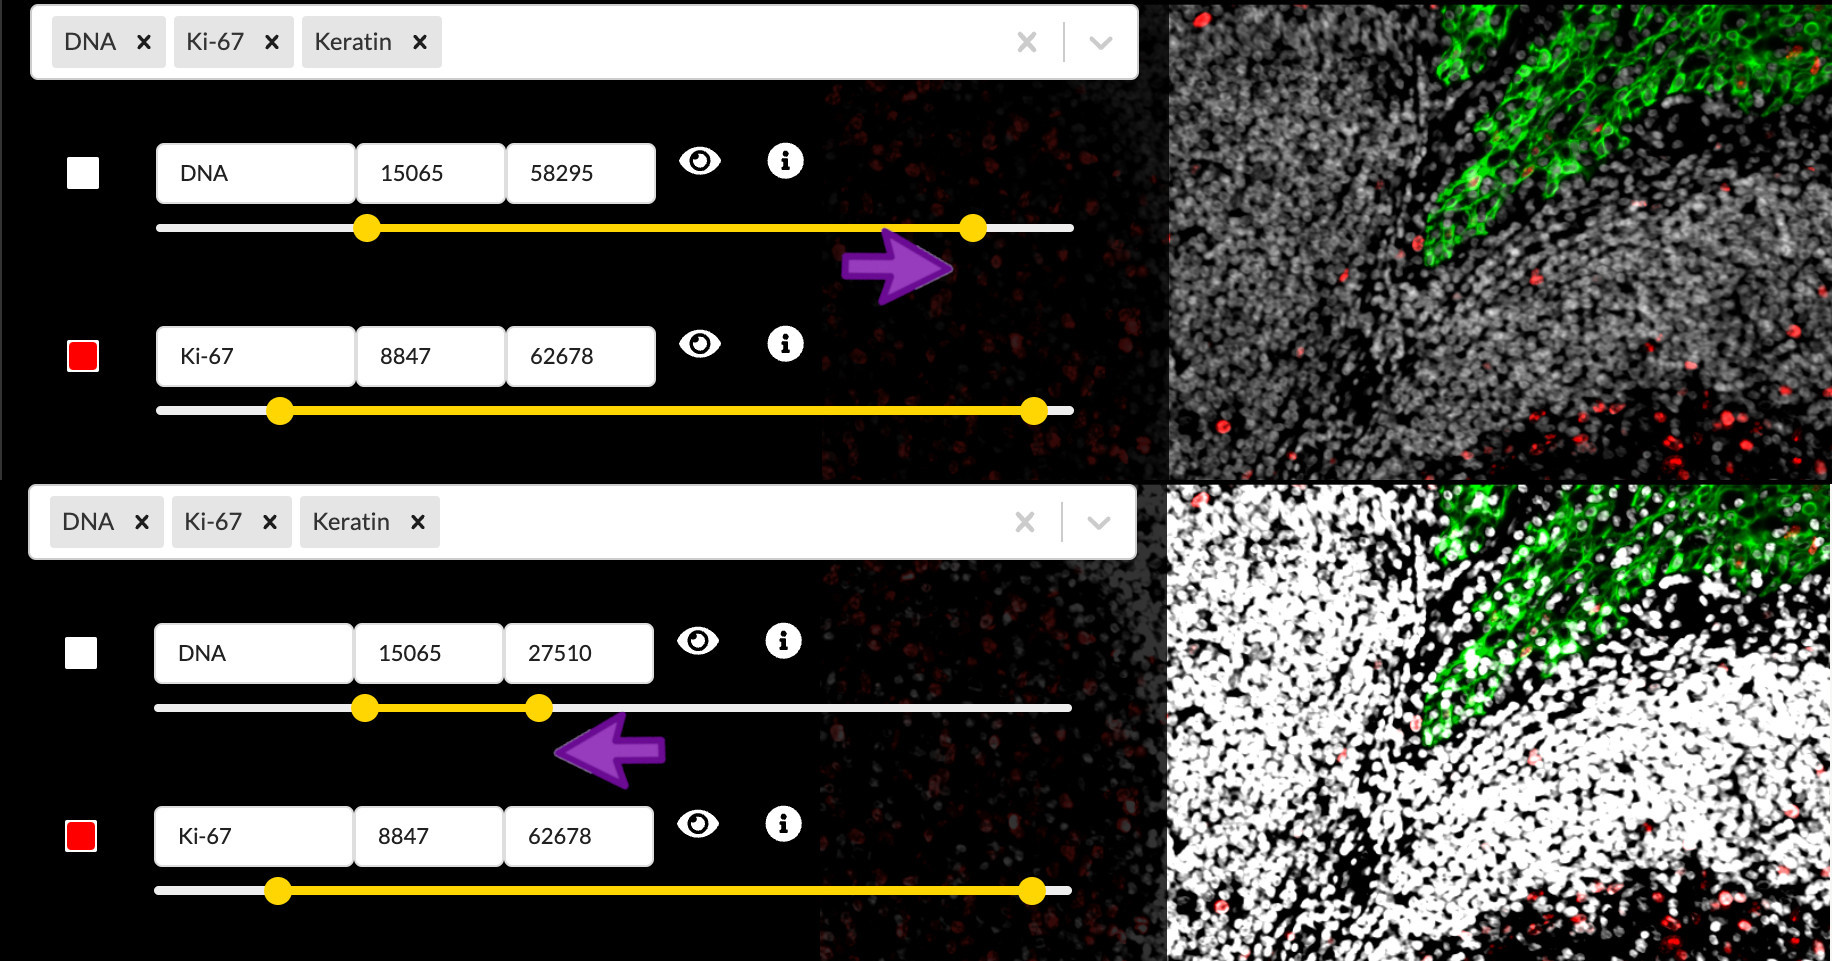
Adjust channel intensity cutoffs
Zoom in to focus on the area between the upper right border of the germinal center and the crypt epithelium. The DNA and CD45 channels are brightest in this region. The Automated settings left things a bit too saturated here, so adjust the intensity cutoffs to fix the problem.
(Hint: You will probably want to toggle the other channels off to view one channel at a time here)
Color selection
You can select the small square to the left of the channel name to adjust the color applied to that channel. You can then select a color within the color selection menu. When satisfied with the color chosen, you can then close the color selection menu by clicking outside of it. Any adjustments will apply to channel within the scope of the active channel group and within any new channel groups created thereafter.

Selecting the color of each channel is a subjective process, but there are several considerations it is important to understand. Fist, the channels in each group are individually colorized and added to create a linearly composited image. Second, the number of distinct channels that can be visualized in a composit image is quite limited. This limitation is due to the nature of additive colors, where, for example, a green channel and a blue channel would be indistinguishable from a yellow channel. These limitations can be circumvented by considering the spatial overlap of channels.
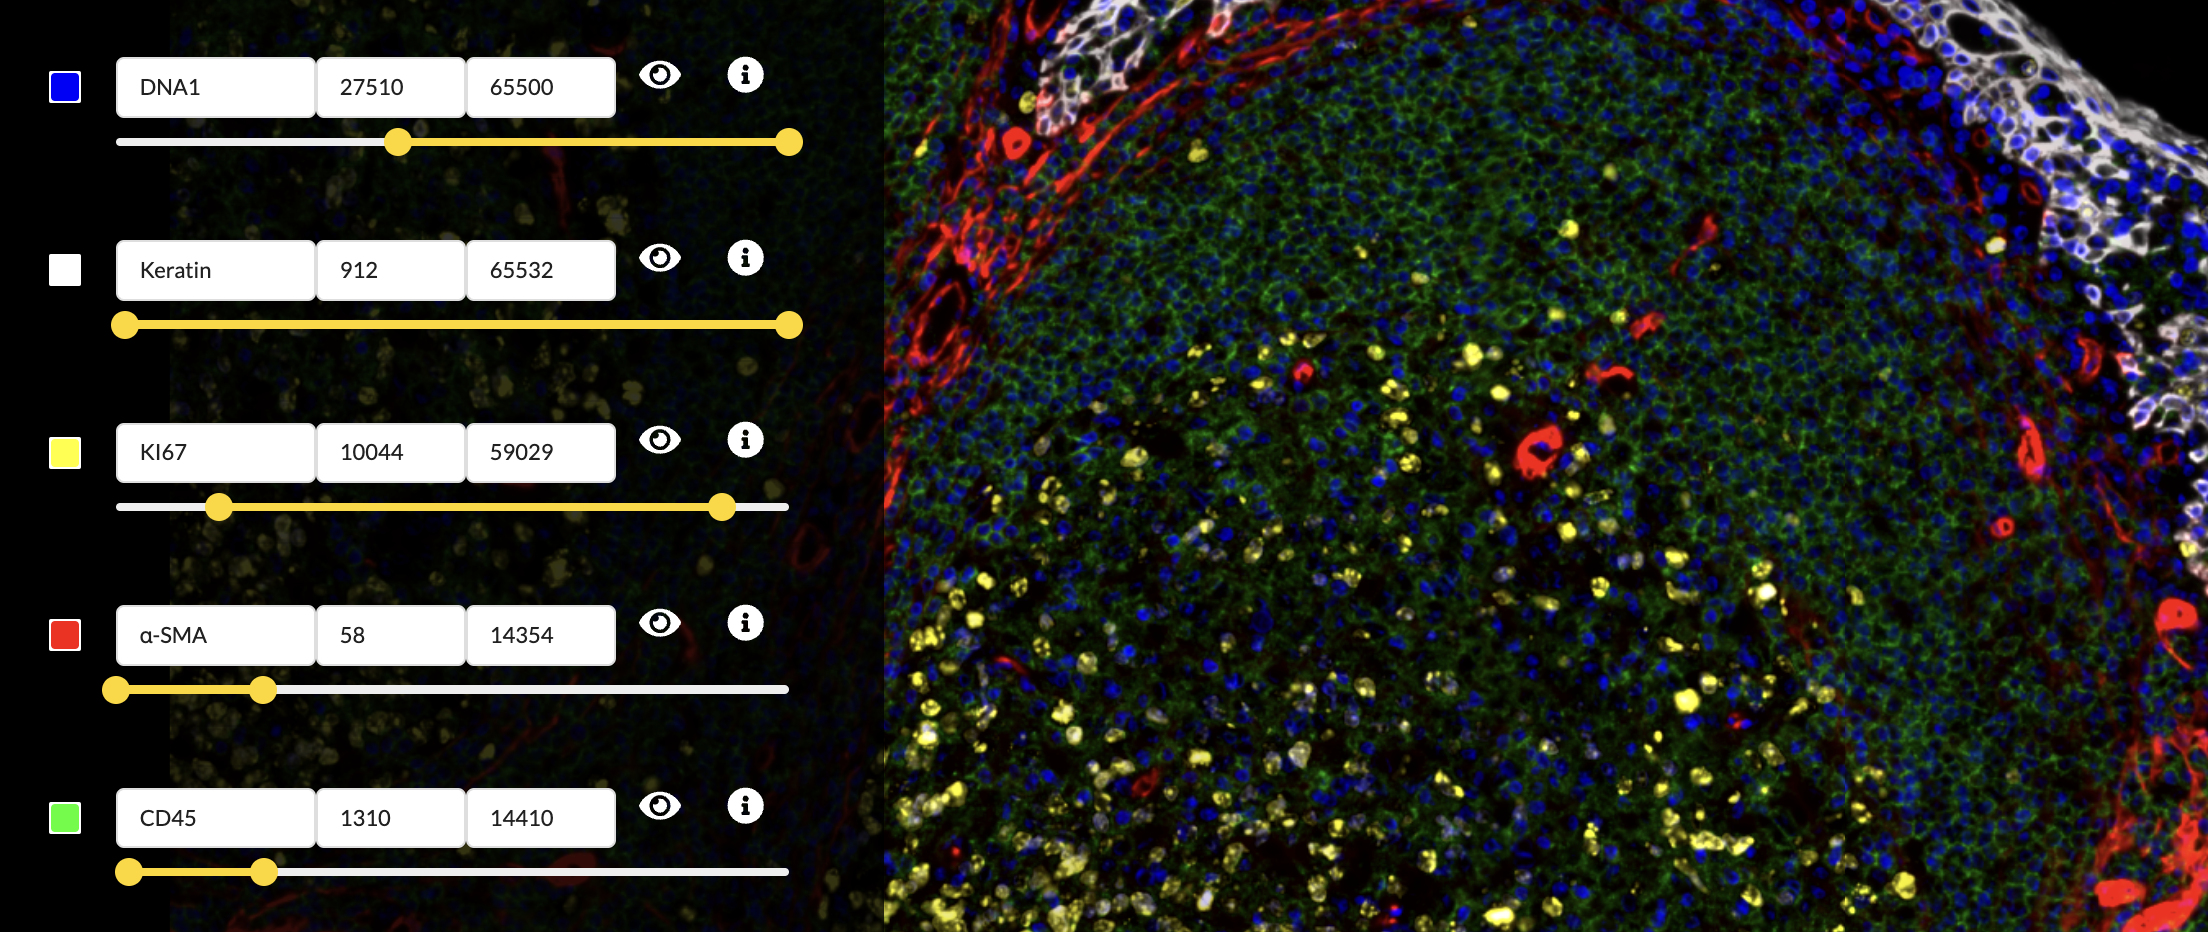
Select channel colors
In the “Edit Groups” tab, select the “Structure Components” group
- Set the DNA1 channel’s color to blue.
- Set the Keratin channel’s color to white.
- Set the Ki67 channel’s color to yellow.
- Set the α-SMA channel’s color to red.
- Set the CD45 channel’s color to green.
Save your Story
After all of this work, make sure to click the Save button!
Key Points
Narrated Stories
Overview
Teaching: 10 min
Exercises: 5 minQuestions
Curated Stories guide a viewer through the data
- The precise purpose and expectations vary depending on the use case.
- The purposes can include a graphical abstract for a paper, a digital figure, ‘eye candy’ for a grant or press, or an educational description of the data.
Story tab
You can open the rightmost tab to edit the waypoints of a story. In this tab, you can change the active waypoint, which will activate the corresponding field of view, group of channels, and text description.

Waypoints define the stops along a guided tour of your image
Waypoints are the defining feature that makes Minerva Stories so effective at communicating complexy tissue biology and imaging data to a wide audience. They serve a similar purpose to audio narration museum tours. When done well, they are like having the expert biologist or pathologist who collected the data give you a personal tour of the image. Waypoints comprise a name, descriptive rich text, a linked channel group, a particular location in the image and zoom level, and optional region-of-interest annotations on the image.
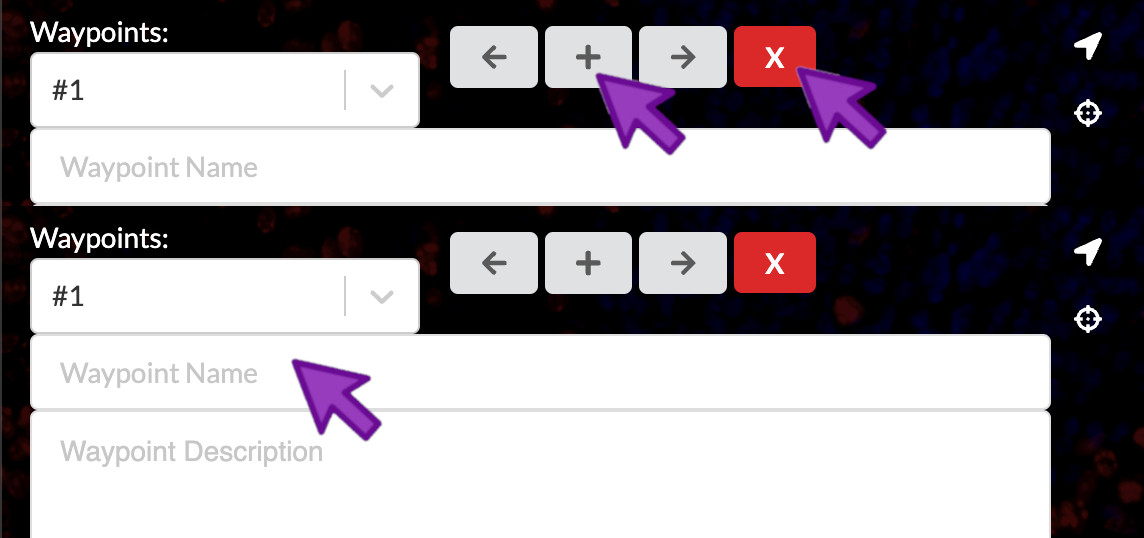
Add or remove waypoints
To add a waypoint, you can click the “+” icon. To remove a waypoint, you can click the “X” icon. To assign a name to a waypoint, you can click the “Waypoint Name” field and begin typing the new name. When writing waypoint names, think of them like short figure titles.
A new story starts with one empty waypoint. A story must have at least one waypoint so you can’t delete the last one, but if its name and descriptive text are empty then it will be hidden in the published story.
Add waypoints
Add two waypoints and give them the following names:
- Structure of normal tonsil
- B-cells and T-cells
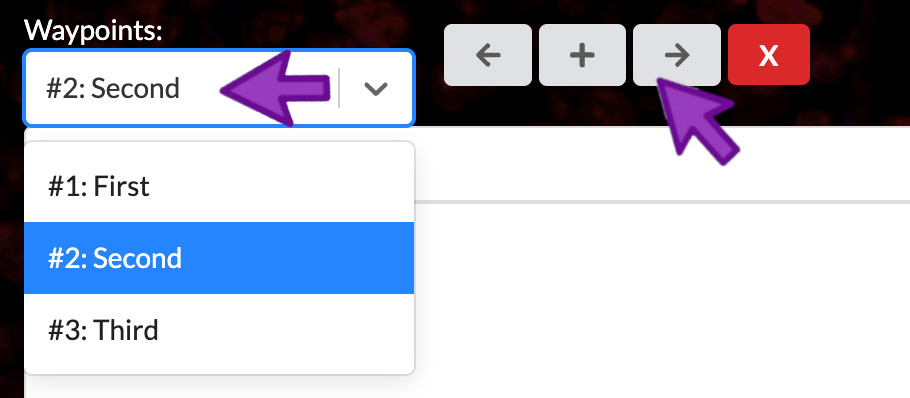
Activate a waypoint
You can click the waypoint dropdown menu to select a waypoint to view and edit. You can also click either the left or the right arrow to navigate between waypoints.
Select field of view and channel group
To choose the image location and zoom level to link to the current waypoint, use the image pan and zoom controls to move the image just where you want it. To select the appropriate channel group that will be linked to the current waypoint, select if fom the Channel Groups dropdown.
Set field of view and channel group
Configure the field of view and channel group for the waypoints as follows:
- Zoom in to focus on the central germinal center, but be sure to keep the crypt epithelium in frame as well. Select the “Structural components” channel group.
- Zoom in further to show the right side of the germinal center and its lower-right border, which is rich in CD4-positive cells. Select the “Immune cells” channel group.
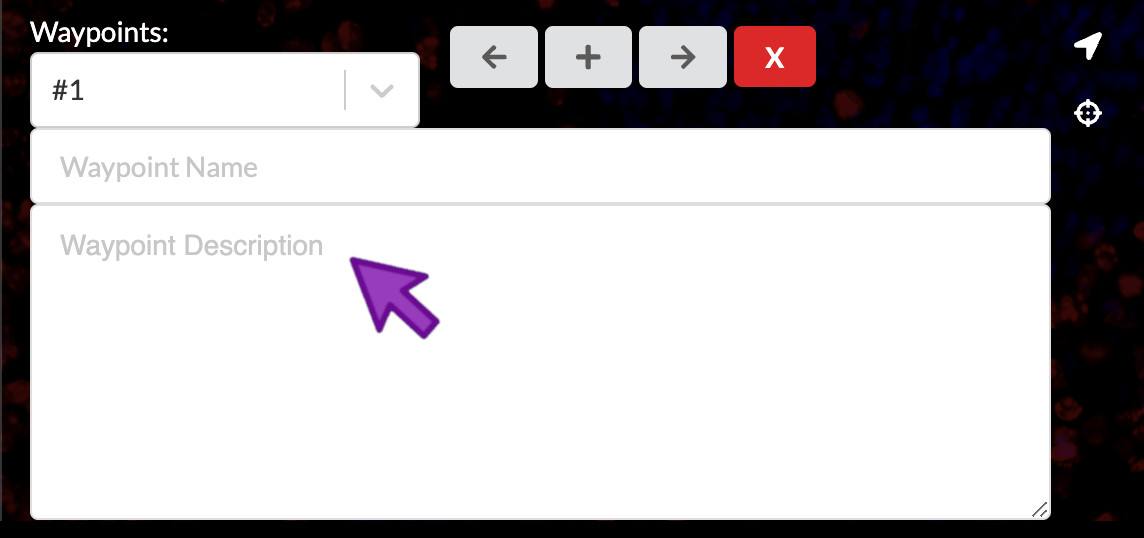
Compose waypoint text descriptions
Waypoints can have associated text descriptions, which can be thought of like a figure legend. They should describe the biology you want to convey to the viewer in the context of the image framing and channel group you have selected. You can write plain text, or you can use Markdown to add rich styling.
If you write one of your channel names in the text, surround it with back-quote characters to have Minerva Author automatically highlight them in the published story with their associated channel color. This helps the viewer better understand the links between the text and image.
Enter waypoint descriptions
Open content-04.txt. Copy the waypoint text provided there into waypoints 1 and 2.
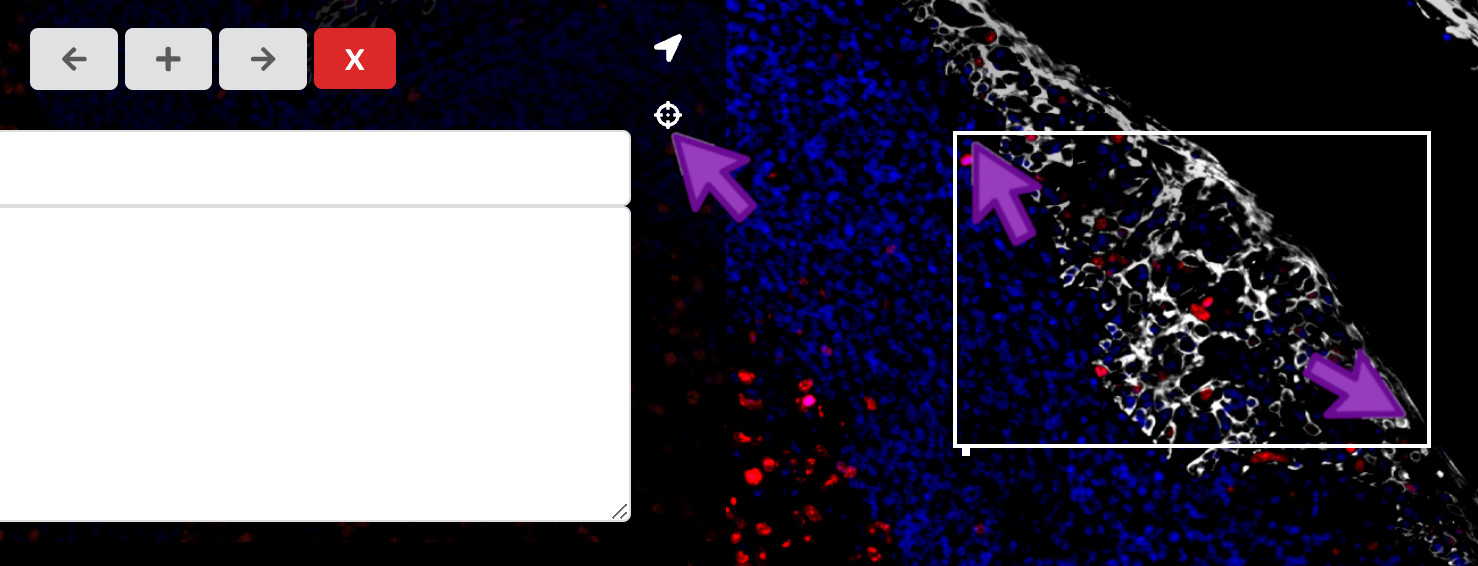
Add a region of interest
To bring attention to a specific region in an image, you can click the crosshairs icon on the right of the waypoints panel. Then, you can click and drag between two diagonal corners of the rectangular region of interest you would like to add.
Add an arrow
To annotate a specific point in an image, you can click the arrow icon on the right of the waypoints panel. Then, you can click the point in the image where you would like to add an arrow.
![]()
Describe the arrow
You can link a text description to your arrow in order to provide a more specific label within a field of view. At the bottom of the waypoint panel, click the label that corresponds to the arrow. Then you can add a description to the arrow. You can click “Hide Arrow” to display only the description, allowing a floating text annotation over the field of view without an accompanying arrow.
![]()
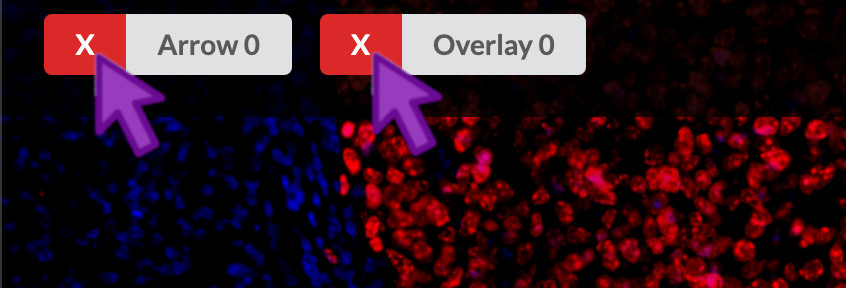
Delete arrows or regions of interest
At the bottom of the waypoint panel, you can click the “X” that corresponds to a given region of interest, arrow, or floating text annotation.
Preview
Now, you can preview your story to display exactly how the audience will view the waypoints.
Key Points
Wrap-up
Overview
Teaching: 10 min
Exercises: 5 minQuestions
What role can Minerva play in your data sharing?
What resources are there to help you create Minerva Stories?
Objectives
Review the 3 main types of stories
Consider how you would share your data with the different types of stories
Introduce the resources for LSP members to make Minerva Stories
Summary of the 3 styles
Activity | What role can Minerva play in your data sharing?
Think of a situation where you had to share your data with anyone, a collaborator, a colleague, a funding agency etc.. If you haven’t encountered a scenario yet, come up with a hypothetical that is meaningful for your project. Try to answer the following questions with the knowledge of Minerva and story types you now have:
- What your goals of sharing your tissue image data? Who are your audiences?
- Which type of Minerva Story would you use? Why?
Resources
Minerva.im has updated and comprehensive information on Minerva
HiTS-internal SharePoint has information tailored for LSP members
Data Sharing with Minerva on HiTS SharePoint
If you don’t have access to SharePoint, please contact Sarah Arena.
We are here to help!
A team of us are here to help you throughout your Story creation process. Below is a list of whom to contact:
-
Coming up with story line, writing waypoint descriptions: Juliann Tefft, Han Xu (especially if the story has an education purpose)
-
Technical challenges using Minerva Author: John Hoffer, Jeremy Muhlich
-
Metadata: Sarah Arena
-
DOI/archiving Minerva Story: Sarah Arena, John Hoffer
-
Navigating the website, using the tutorial: Han Xu, John Hoffer
-
Pushing Stories: John Hoffer
*See the next session for what John would need from story authors.
- Adding your published story to the Harvard Tissue Atlas website: Sarah Arena
Publication Checklist
When you are ready to publish your Story, provide these things to John:
| story.json file | When you Save your progress in Minerva Author, a story.json file will be created and saved in the same folder as your Minerva Author executable |
| (optionally) path of image on O2 | Your story.json files will contain a reference to your image data, but if file has moved or file name has changed, it may be hard to locate. John will follow up if he needs your image file path. |
Key Points
minerva.im and SharePoint are the two best go-to places for information on Minerva.
A team of us are here to help you throughout your story creation process!