Curated Stories
Overview
Teaching: 10 min
Exercises: 5 minQuestions
How can I improve my automated story to better explain my science?
Objectives
Switch between Minerva Author’s three main editing modes and understand what tasks each one is used for.
Enter sample overview information including MITI metadata.
Create, rename and delete channel groups.
Refine channel groups by adding and removing channels.
Add channel description text to help viewers interpret the image.
Adjust channel color and brightness & contrast to highlight desired image features while de-emphasizing irrelevant ones.
Curated Stories are reviewed for quality and context
- Curated stories involve human review for accuracy, quality and context.
- A curated story specifically includes MITI metadata and fine-tuned rendering settings.
- The stories ensure that the data is represented ideally and understandable to others.
The authoring interface has three main modes
Minerva Author has three main modes for editing a story. You can switch between these modes by clicking the gray buttons just below the Save/Publish/Preview buttons. We will follow a particular sequence through the different modes during this tutorial, but on your own you are free to switch back and forth at any time.
- Sample Info lets you adjust settings and enter information that relate to your image as a whole and manage the initial image view shown when viewers first open your story.
- Edit Groups is where you manage Channel Groups, which we briefly touched on in the previous episode.
- Edit Story allows creating narrative guide elements.
For Curated stories we will only work with the first two, Sample Info and Edit Groups.

Sample Info
Click the “Sample Info” button to switch to Sample Info editing mode.
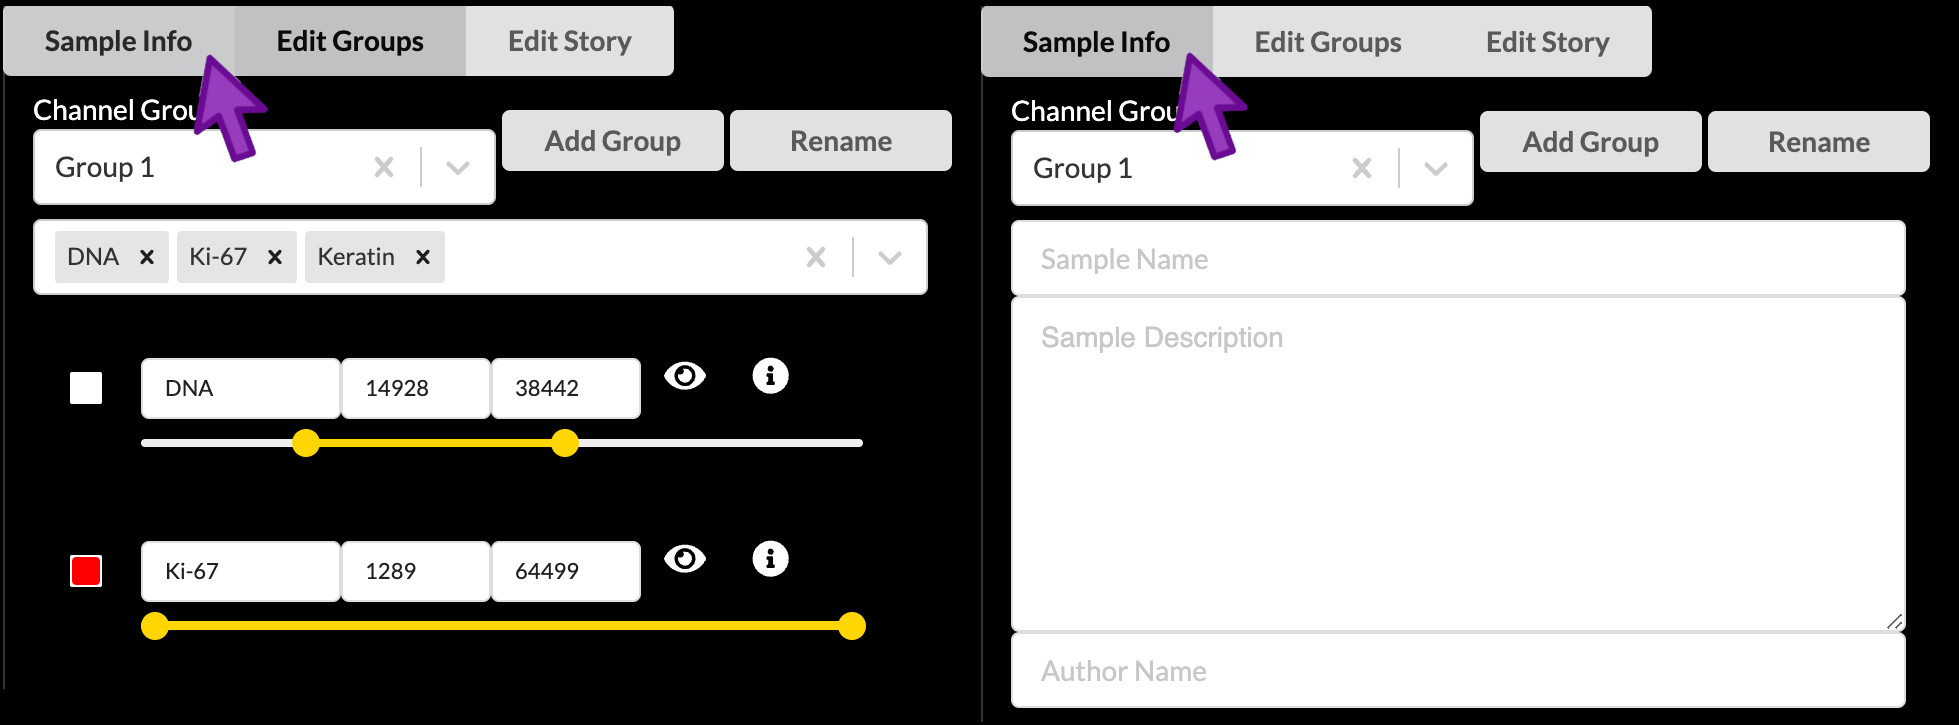
Enter sample name
Although the first item at the top of the edit screen is the Channel Groups selector, we will skip over this for now and return to it later. The first thing we will edit is the Sample Name field, which will serve as the title of the story. The LSP guidelines for a Curated story title are as follows:
- Less than 75 characters (including spaces)
- Include the following pieces of information:
- Tissue histology or sample type
- Sample identifier (usually LSP Slide ID)
- Preparation or imaging method (optional)
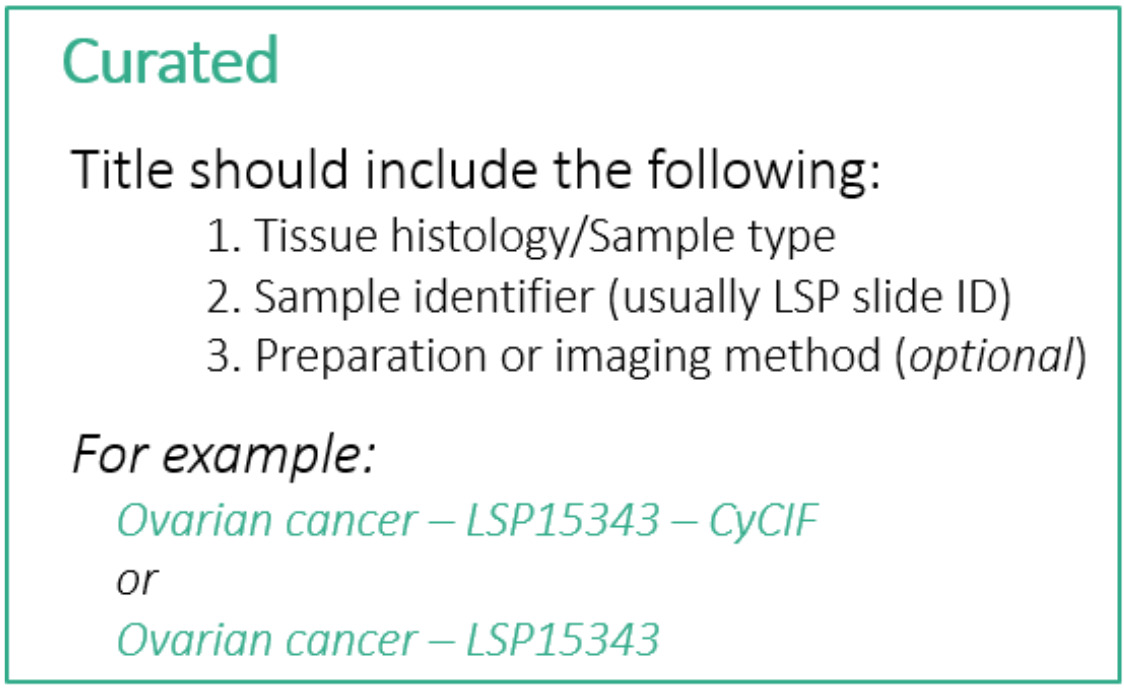
For this story we will follow these guidelines and use the title “Tonsil - TONSIL-1 - CyCIF”. You can find this title text in the file content-03.txt that we downloaded during setup. Open that text file now and leave it open for the rest of this episode as we will be copying other pieces of text from it. The title text is at the top under the heading “Title”.
Write a plain-language summary to provide context
Next we will proceed down the screen to the Sample Description field. Here you will begin by writing a short summary of the sample in plain text to provide context to viewers of the story. This summary should include a few key pieces of metadata such as the sample origin, basic demographics, and patient diagnosis. You can find a pre-written summary in content-03.txt under the heading “Sample summary”. Copy the text there and paste it into Minerva Author in the Sample Description field.
The Sample Description field allows you to apply rich text formatting using a special syntax called Markdown. You can look up a Markdown guide online to find out what it can do, and we’ve provided a link to such a guide in the reference material for this lesson. The provided summary text does not use any Markdown syntax, but in the next step we will see some basic examples.
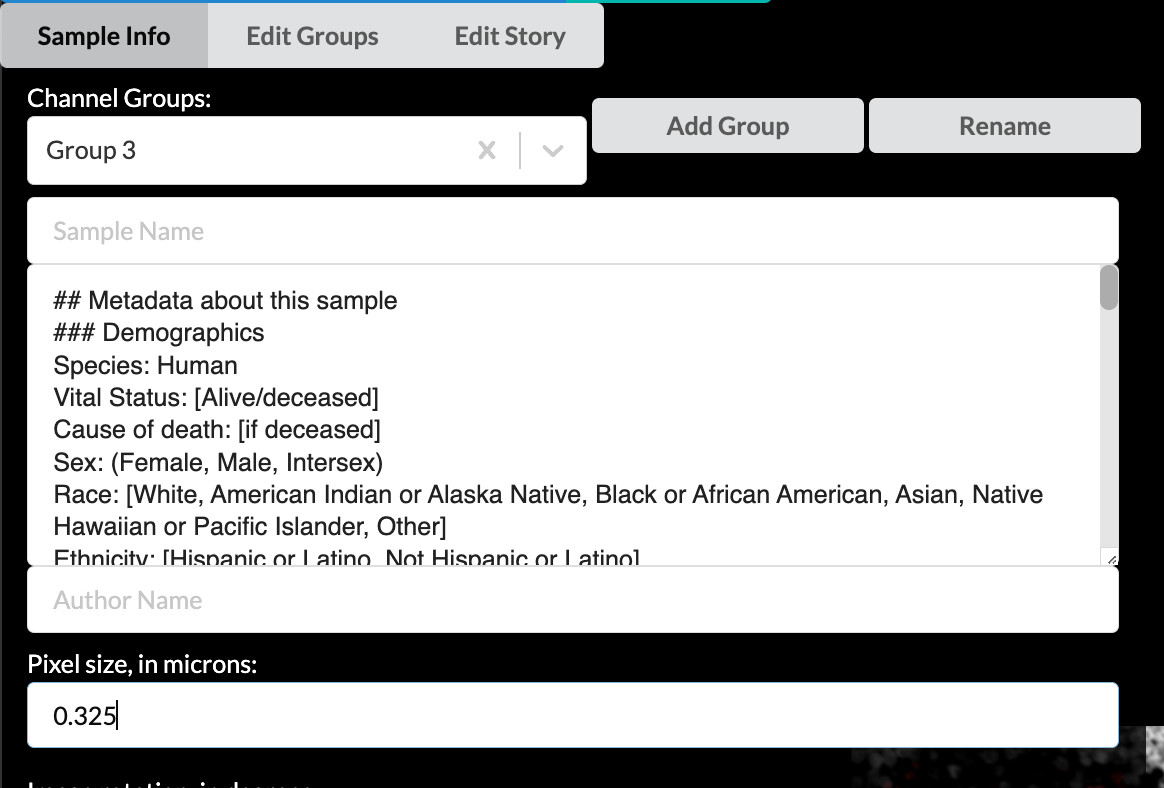
Paste and edit the MITI metadata template
Below the summary text you will now append relevant metadata fields based on the MITI (Minimum Information about Tissue Imaging) standard. LSP has a comprehensive metadata template hosted on SharePoint, but for today we will use a shortened version. The template provides an easy-to-edit Markdown-formatted list of the metadata fields that you should strongly consider filling out where relevant. It provides a common baseline that all Curated stories at LSP should meet, but you can always add more fields to your story if you like.
Switch to content-03.txt and copy the text under the heading “Metadata template”. Paste the text below the summary text we added in the previous step. You will notice some unusual punctuation characters like pound signs and asterisks – these are part of the special Markdown syntax to create headings, bold text, and the like, but you will not have to touch any of that for the template. You will fill in your values at the end of each line or edit the placeholder text as needed. It is important to enter your text immediately next to the final asterisk, leaving the two blank spaces at the end of each line in place (these spaces are required for the template formatting to work properly).
Lastly, using the field values provided below the metadata template section in content-03.txt, fill in the corresponding lines in the metadata template (Site of Resection or Biopsy, Microscope, Objective, and Attribution). I will fill out my template as a reference to follow. For this tutorial, you can choose to either delete all the irrelevant or unknown fields or play around with filling them out however you wish. As the sample was fully deidentified as part of the sample collection protocol, we simply don’t have much information about the patient.
Click the Preview button to view your Sample Description content as it will look once published and make sure the content and formatting looks the way you want it to. Close the preview tab when you’re ready to continue.
Verify or enter pixel size to create a scale bar
Farther down the screen you will see a field labeled “Pixel size, in microns”. A value of approximately 0.325 should have been automatically loaded from the OME-TIFF metadata in our example image. For your own stories, always check that this value is correct. If it is blank, look up the pixel size for your image (also called nominal image resolution) and enter it here. The value must always be specified in microns. The value in this field will be used to give your story a scale bar, which is a crucial component of image interpretability.
Editing channel groups and channel settings
Next we will spend some time learning how to edit channel groups and channel settings. Click the “Edit Groups” button to switch to that mode.
As we have seen, the way the image channels are grouped by the Automated story creation process does not necessarily highlight useful aspects of tissue biology that you might wish to show to your story viewers. The first thing we will do to address that is decide on more useful groups and rearrange our channels accordingly.
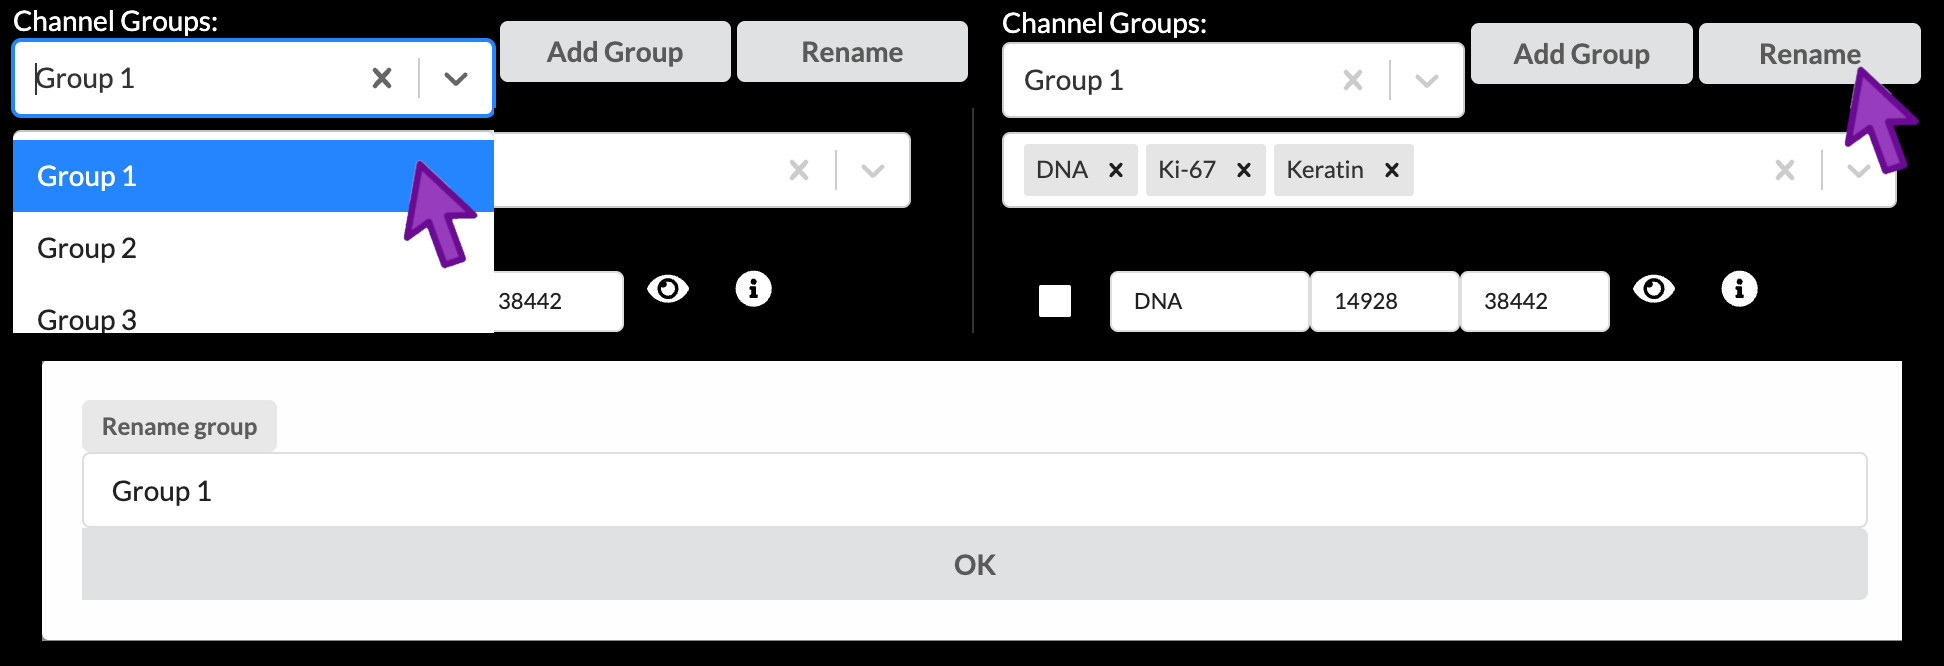
Select and rename a channel group
You can select a channel group to work with from the dropdown menu under “Channel Groups”. To change the name of a channel group, click the “Rename” button, type the new name into the popup, then click OK. Each channel group must have a unique name within a story.
Addding and removing a channel group
A new channel group can be added by clicking “Add Group”, typing the desired name in to the popup, and clicking “OK”. The currently active channel group can be removed by clicking the “X” just to the right of its name.

Removing a channel group never deletes the channels that were in it
Channels themselves can never be deleted from a story. If you delete a channel group, its channels always remain available to add to other groups.
Let’s make our first group show the overall tissue architecture of the tonsil tissue, along with a general-purpose immune cell marker. It looks like Group 1 is already pretty close, containing DNA, Ki-67, and Keratin, so we will rename Group 1 for this purpose. Then we will create a new group to highlight different immune cell types, and lastly delete Group 2.
Rename, add and remove channel groups
- Rename the channel group “Group 1” to “Structural components”.
- Add a new channel group named “Immune cells”.
- Delete channel group “Group 2”.
Adding and removing channels from groups
You can add a channel to the active channel group by clicking the down arrow in the channel dropdown menu (or the empty white space to the left of the arrow) to open the list of channels, followed by clicking a channel. You can also type to search for a channel by name while the channel list is open. Remove a channel from the group by clicking the small “X” next to its name. If you ever want to remove all channels from a group, click the large “X” near the right side of the channel dropdown menu. Note that a channel may belong to more than one group at the same time – for example, many stories of CyCIF images include the first DNA channel in every group as a reference to show where all cells are located regardless of marker expression.
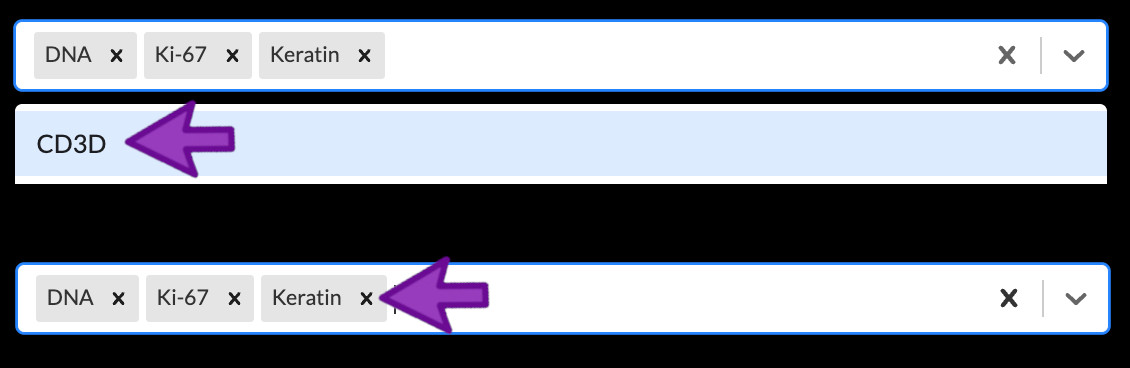
Removing a channel from a group does not delete the actual channel
This is another reminder that channels themselves can never be deleted from a story. If you remove a channel from a group, it always remains available to add to other groups.
Reordering channels within a group
You can drag the gray channel name boxes left and right to change their order. This only changes the order in which the channels will be presented in the published story’s channel legend but can be useful in some cases.
Now we will refine our two channel groups to contain the correct channels.
Add and remove channels from groups
- Add the following channels to the “Structural components” group:
- α-SMA
- CD45
- Remove the following channels from the “Structural components” group:
- CD3D
- CD4
- Drag Keratin left to order it between DNA1 and Ki-67.
- Add the following channels to the “Immune cells” group:
- CD20
- CD8A
- CD4
- CD3D
Channels may extend beyond your screen
When a channel group contains more channels than can be displayed on a single screen, you can use your mouse or trackpad to scroll down to view the additional channels.
Adjusting per-channel settings
Now we will move our focus down from the channel dropdown menu to the channel settings list where we can adjust name, color, brightness and contrast, and more.
Renaming channels
You may rename a channel by clicking on the box containing its name in the channel settings list and editing the text.
Rename channels
- Edit the DNA1 channel’s name to “DNA”.
- Edit the KI67 channel’s name to “Ki-67”.
Creating channel descriptions
Short channel names are an efficient shorthand for those who already know the significance of the referenced proteins or other biomarkers, but they are much less helpful to outsiders from a more general audience. It is strongly suggested that you write a brief description (up to 30 characters) of each channel that explains its intended interpretation in the context of the tissue sample and the overall experiment. You can add these descriptions to the channels in your story by clicking the encircled “i” button to the right of a channel’s entry in the channel settings list. Then enter the channel’s description into the popup and click OK.
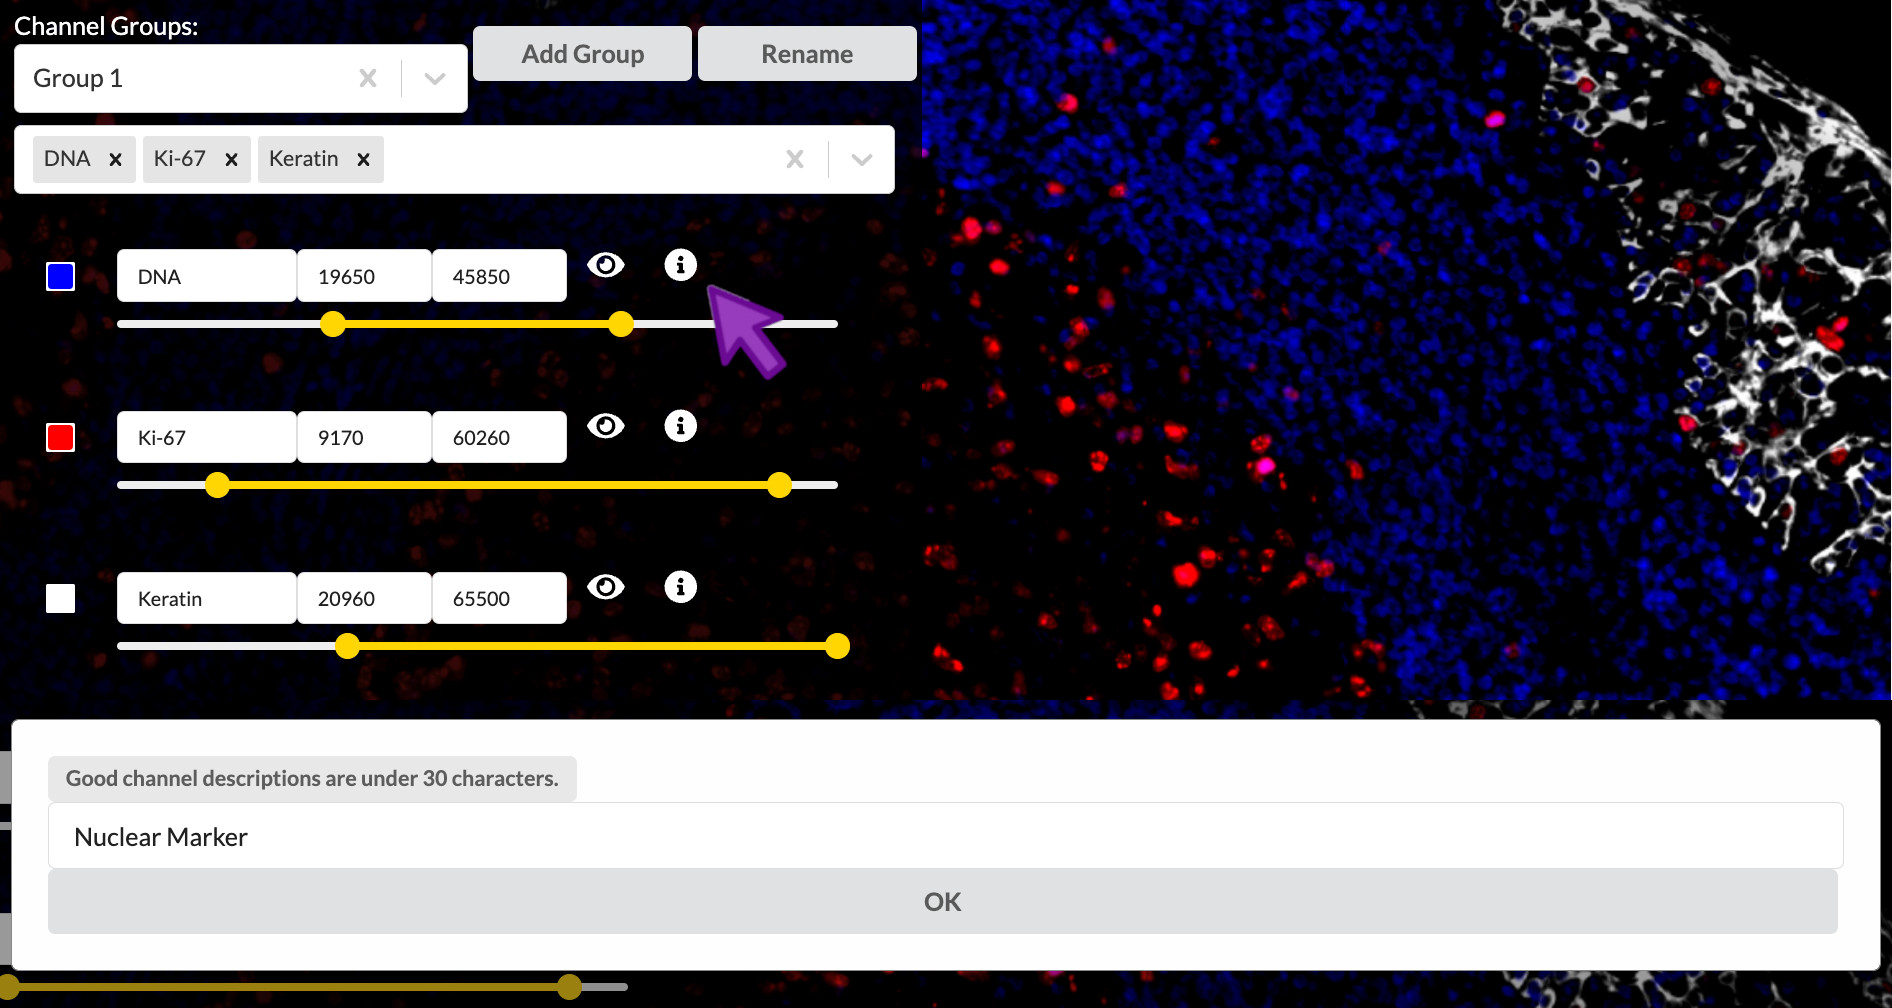
Enter channel descriptions
Set the channel description for all nine active channels as follows. This text is provided at the end of content-03.txt if you wish to copy and paste it. Note that you will need to switch between the channel groups to get to all the channels.
- DNA1: Nuclei
- Keratin: Crypt epithelium
- Ki-67: Proliferating immune cells
- aSMA: Blood vessels
- CD45: Immune cells (general)
- CD20: B-cells
- CD8A: Cytotoxic T-cells
- CD4: T-helper cells
- CD3D: T-cells (all)
Toggle a channel’s visibility
You can show or hide a channel by clicking the “eye” icon to the right of its entry in the channel settings list. This effect is not reflected in the published story, but it can be useful to temporarily isolate channels when adjusting color or brightness and contrast settings.

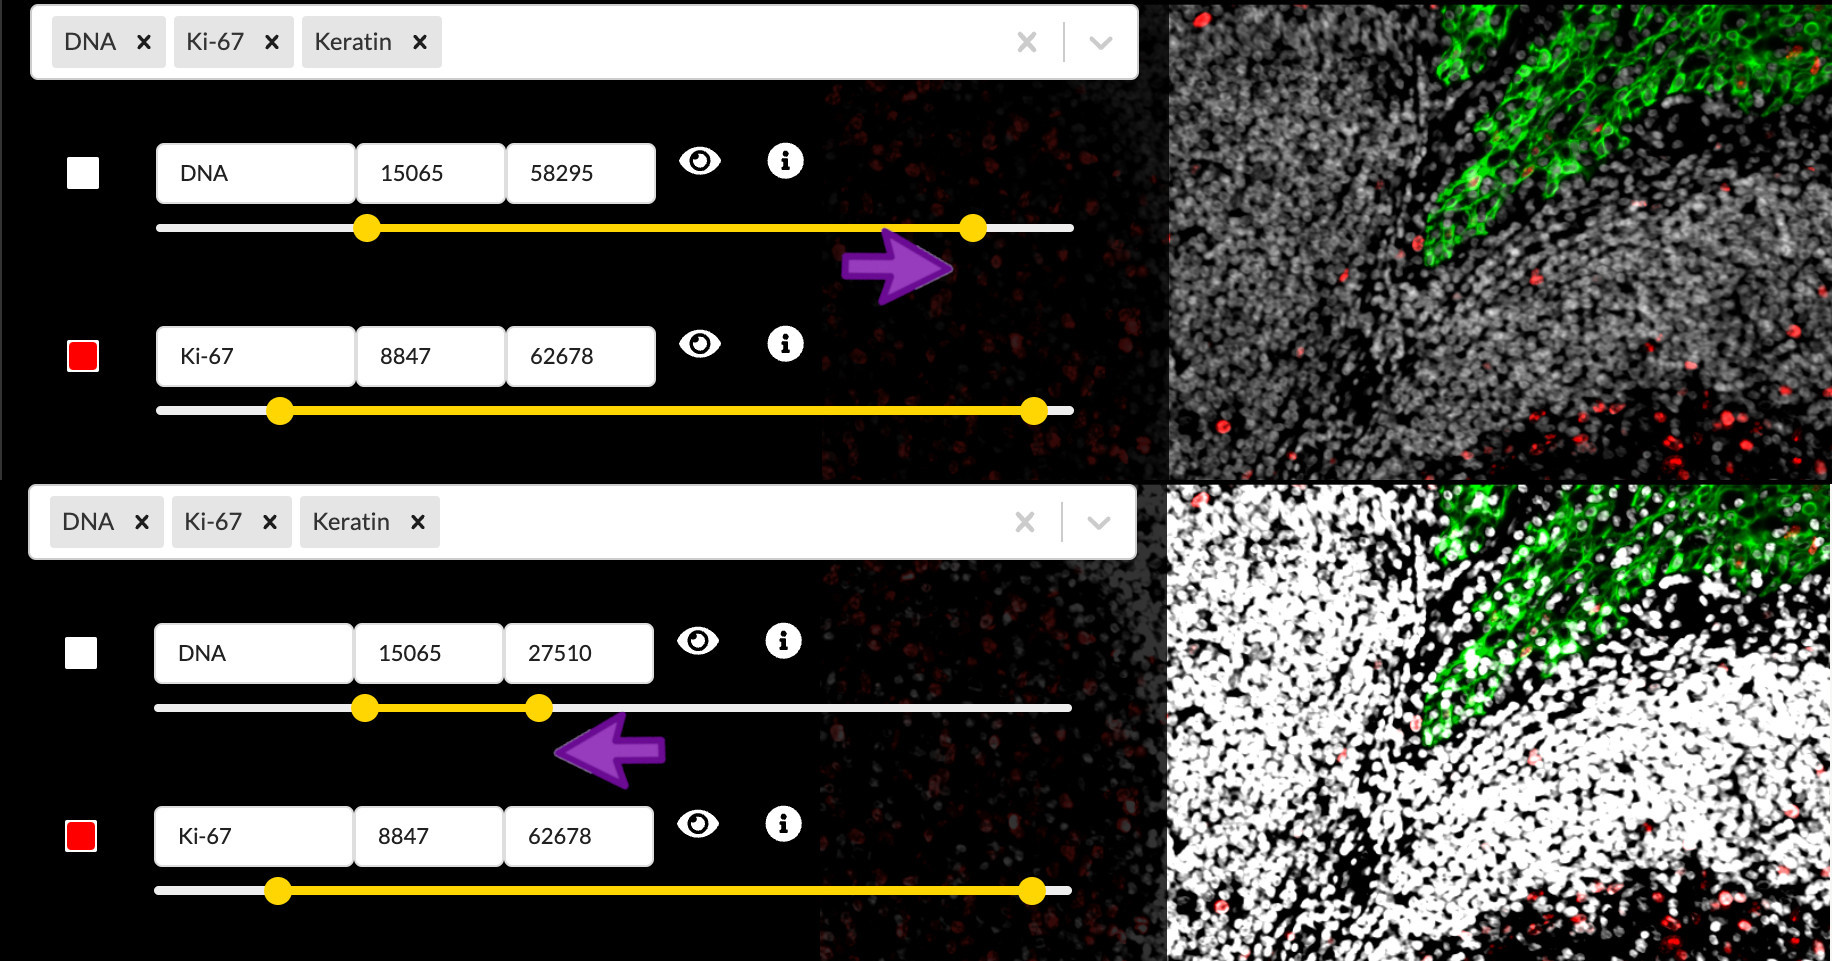
Brightness and contrast
You can move the endpoints of the yellow intensity range slider to adjust the brightness and contrast of the corresponding channel in the active channel group. Moving the right handle of slider will set the upper intensity cutoff value, meaning all pixels brighter than this value will be displayed at maximum brightness. The left handle controls the lower cutoff, meaning all pixels dimmer than this value will be displayed as black, in other words not visible. Pixel values in betweeen the two cutoffs will be mapped linearly to brightness values on the screen display. Any adjustments will to apply to the channel across all channel groups it is in and any groups it may be added to in the future.
Notice that these cutoffs are all at different values in each channel, and they did not start at their extreme values as is often the case in other image display applications. This is part of the Automated story process and actually happened when you first loaded the image in the previous episode. Minerva Author uses a statistical model to make a principled guess at what the cutoff values should be based on the distribution of pixel intensity values in each channel, but it isn’t perfect and it has no idea of what part of the signal intensity scale is actually relevant to your biology.
Lowering the upper cutoff has the effect of increasing the channel image brightness, so you usually want to lower it as far as possible. However lowering it too far will wash out the brighest parts of the image and destroy the texture and finer details of those cells. Raising the lower cutoff has the effect of hiding background signal and dimmer non-specific binding, raising the apparent signal-to-noise ratio. However raising it too far will hide important details in the dimmer regions of the image. Adjusting the intensity cutoff values requires making tradeoffs between a punchy image and faithfully representing the data.
The intensity range slider provides a direct way to control how each image channel is rendered, yet has the same effect as adjusting brightness and contrast. The goal is to keep in mind the biological significance of the image representation while presenting what you want your viewer to see.
Adjust channel intensity cutoffs
Zoom in to focus on the area between the upper right border of the germinal center and the crypt epithelium. The DNA and CD45 channels are brightest in this region. The Automated settings left things a bit too saturated here, so adjust the intensity cutoffs to fix the problem.
(Hint: You will probably want to toggle the other channels off to view one channel at a time here)
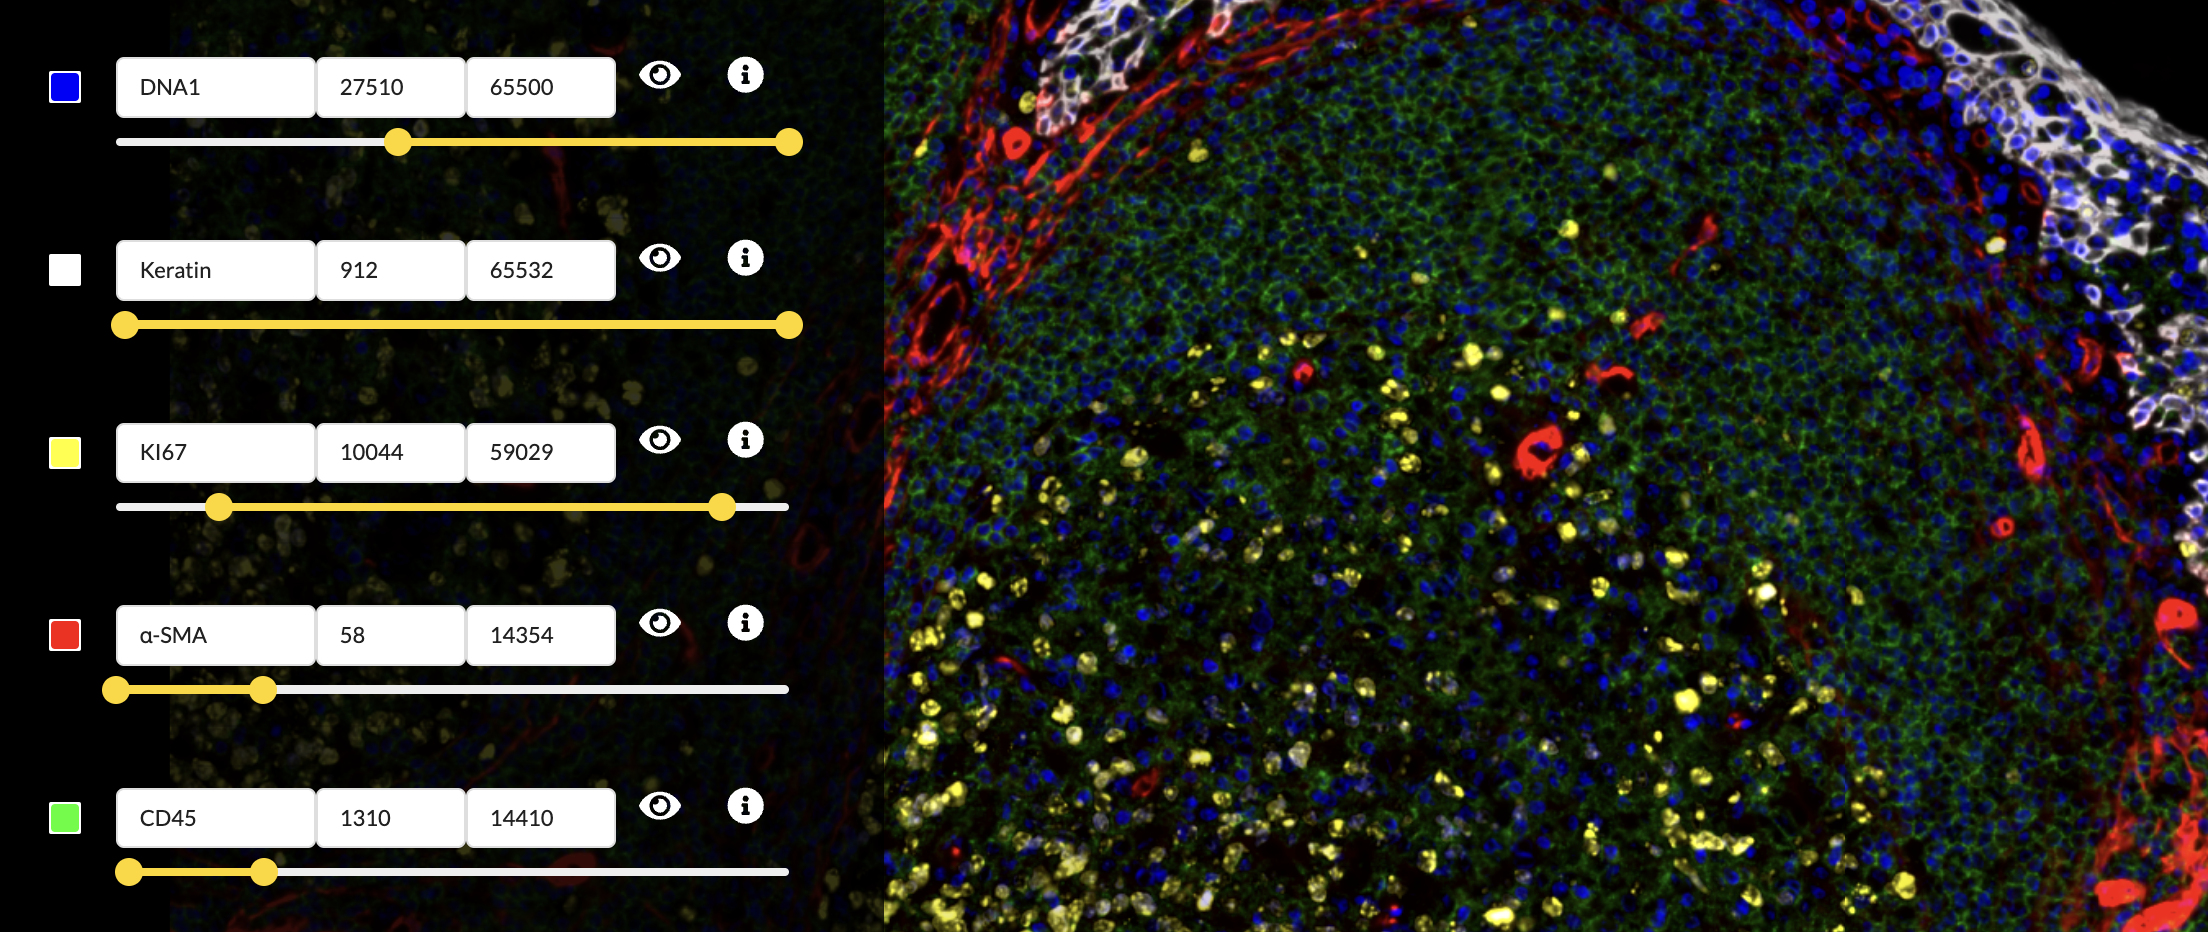
Color selection
You can select the small square to the left of the channel name to adjust the color applied to that channel. You can then select a color within the color selection menu. When satisfied with the color chosen, you can then close the color selection menu by clicking outside of it. Any adjustments will apply to channel within the scope of the active channel group and within any new channel groups created thereafter.

Selecting the color of each channel is a subjective process, but there are several considerations it is important to understand. Fist, the channels in each group are individually colorized and added to create a linearly composited image. Second, the number of distinct channels that can be visualized in a composit image is quite limited. This limitation is due to the nature of additive colors, where, for example, a green channel and a blue channel would be indistinguishable from a yellow channel. These limitations can be circumvented by considering the spatial overlap of channels.
Select channel colors
In the “Edit Groups” tab, select the “Structure Components” group
- Set the DNA1 channel’s color to blue.
- Set the Keratin channel’s color to white.
- Set the Ki67 channel’s color to yellow.
- Set the α-SMA channel’s color to red.
- Set the CD45 channel’s color to green.
Save your Story
After all of this work, make sure to click the Save button!
Key Points